Monday, April 1, 2019

2019 FMQ Along - Part 10: Fast Feather Border

Greetings all -
Happy April Fool's Day!
*
Be careful out there...
You never know what Fool may come your way.
*
Welcome to Part 10, 
the final FMQ portion of our  
2019 Free Motion Quilt Along.
This week we're stitching the outside border.

I'm excited for you that 
we're nearly complete 
but I'm also a bit sad that our time together is winding down.

Wendy and I were texting this morning -- giving thanks for the opportunity to collaborate on the QAL and keep in touch weekly (rather than bi-annually at Market !).
*
Who knows what other "projects" we might find to continue to keep in touch ;)

We hope you've enjoyed your time here too!

To recap...
We started with a 1 yard cut of fabric:
Lewe the Ewe panel by World of Susybee...
We added this awesome book by Wendy Sheppard,
Stitching Pathways.
We each chose our favorite Aurifil threads
and some batting....

I sandwiched with one layer of Quilters Dream Wool -
  It really does "Quilt Like a Dream". 
There's minimal shrinkage and it can be machine washed and dried
 (albeit on cool temps) .  
You can read more about Dream Wool by clicking here.


and we've spent a few weeks sharing how we would each quilt this beautiful panel.

I've stitched Reflections and Pebbles
and Loops and Swirls
and a variety of other fun quilting motif.
Hopefully you've learned a LOT!
*
Let's move forward to the 
specifics for this week
and stitch a new feather variation...
*
Feathers, 
feathers, 
 feathers...
I Love Feathers!

Any Shape
Simply Spring Fleur - Janome Home Machine w/ Aurifil Thread
Any Medium
My Sketchbook Doodles
Stitched on... Any Machine
Innova Longarm Free Motion with Aurifil 28wt
 I just LOVE Feathers!

If you're like me, you've gone page by glorious page through Stitching Pathways.
Feather details begin on Page 54 and continue through Page 66 !  
Now, that's a Feathered Frenzy...!!

Wendy's instruction and detail couldn't be more helpful for learning to FMQ Feathers.
Give those pages a run - through.
See what catches your eye.
Try some out, you can't go wrong!

 With the remaining border being varying widths and lengths I thought it appropriate to choose a design that was flexible -- that could shrink or grow as necessary.

So I stitched a variation of Wendy's
Pseudo Feathers found on Page 66
in Stitching Pathways.
I refer to my version as
Fast Feathers.

They are called this because, like Wendy's Pseudo Feathers, there is space between each feather plume.

Generally I'll draw/stitch a fiddle head (fern)
 and "grow" feather plumes from the "spine" of the fiddle head.

Else, you could draw/stitch a swirl and grow the feather plums from it.

Fast Feathers are generally unplanned and unmarked, although I will at times sketch in a simple spine so I have a clue as to where to fill with plumes.

Here's a practice sketch of fast feathers:
Have I mentioned that I like to practice on paper and fabric before I begin stitching the real project.
 
Practicing either way is a great opportunity to get warmed-up and to build muscle memory for that design.

At International Quilt Market last year many Aurifil Designers shared their skills and expertise with  Facebook Live feeds from the Aurifil booth. 

You can get a glimpse of me stitching out Bumpback and Fast Feathers in this video
recorded live!
(Best when viewed from a computer - not a mobile device).

Another Fast Fun Fact!
Did you know that Wendy and I are both Aurifilosophers ?
We're 2 of a group of 21 certified educators for Aurifil thread.
You can see our funny video clip here
and read about Aurifilosophy here.

But I digress...

Let's get some feathers stitched out...

Here's a few clips of my progress.
You can see where practicing a swirl and a plume would come in handy...
For consistency I used Aurifil 40wt thread color #2024 again.
I added in a few "extra" swirly plumes as necessary and traveled to make a new swirl or fiddle head as I needed to move along the border.
I love how the inside border swirls and the new fast feathers complement one another.
As you travel creating the design try to mix-up the direction of your plumes -- so they are not all going to the same direction.
It's pretty easy to turn a corner -- backtrack if necessary!
It's all starting to come together now...
Love, love, love the texure!
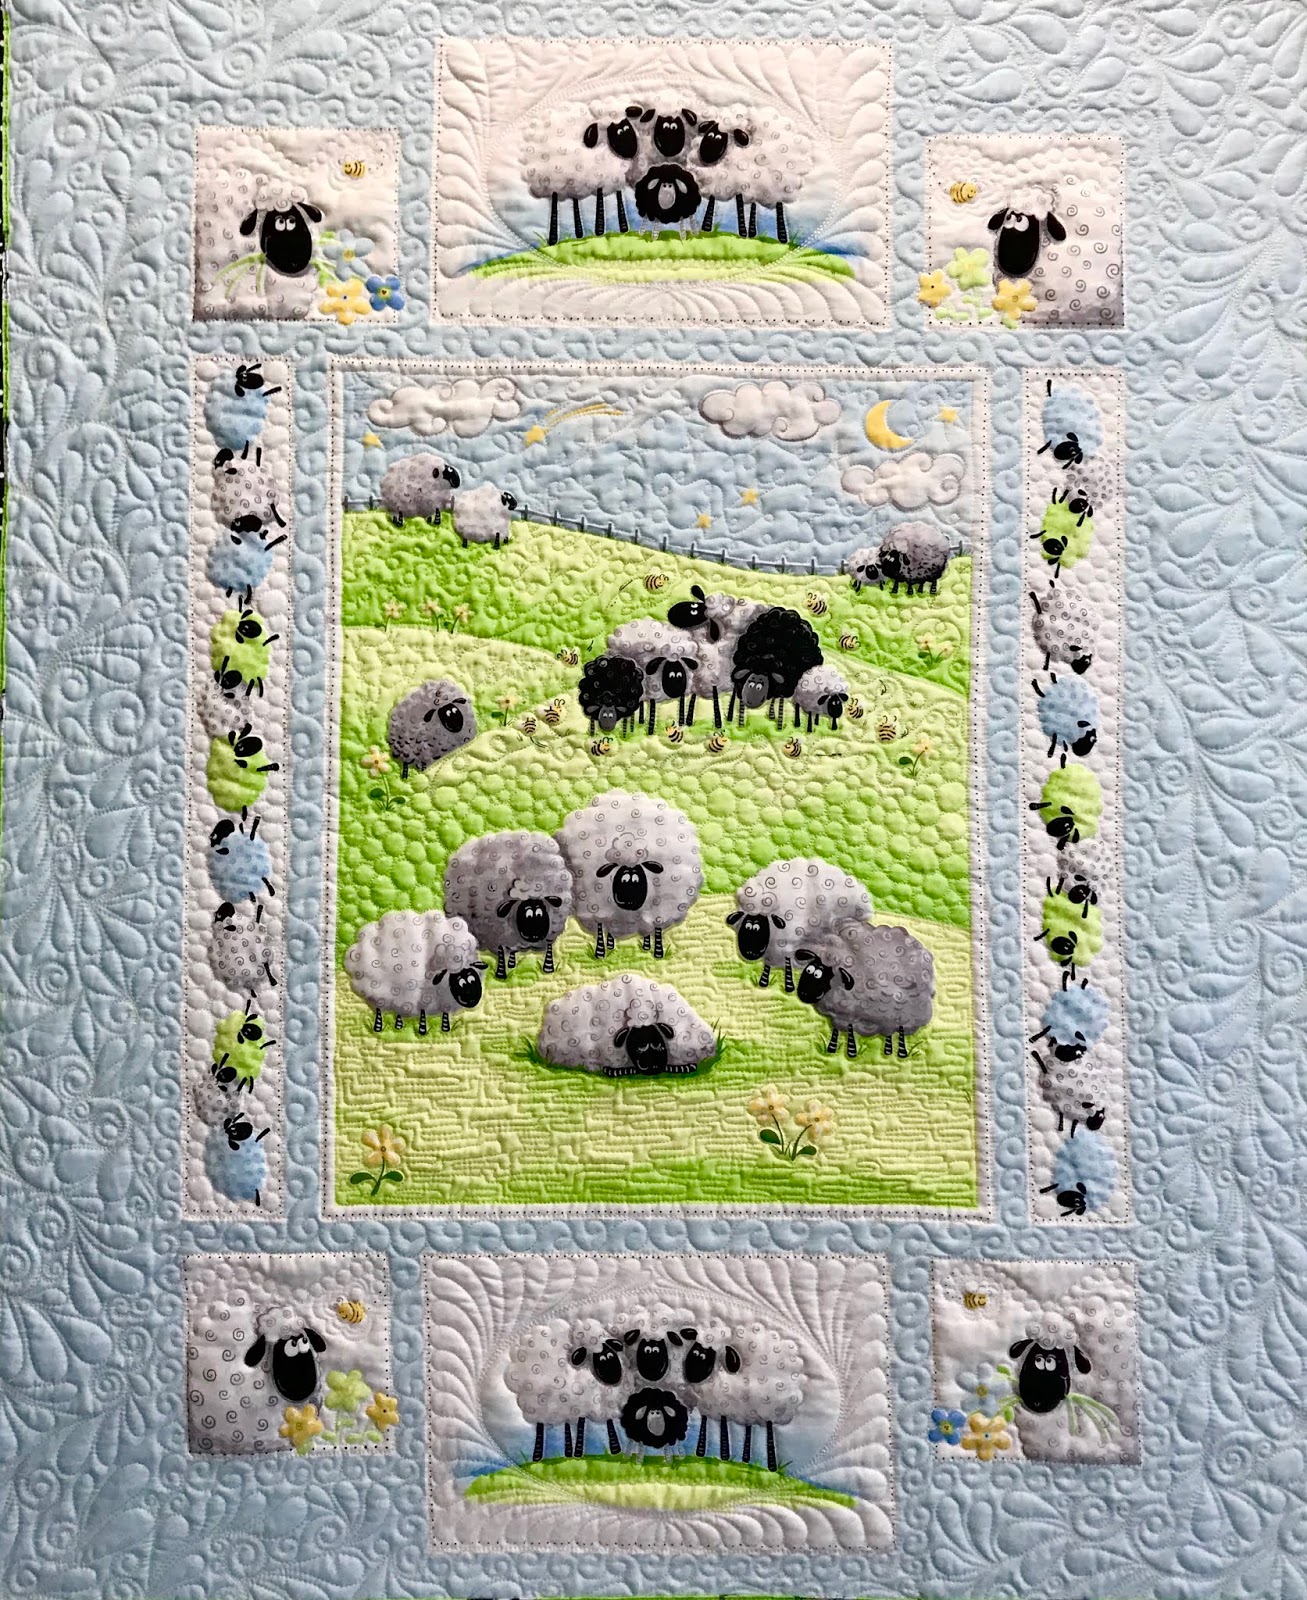
Pay no attention to the fact that I didn't take pictures until after the binding was on!
Ooops...
We'll talk binding, hanging and labels next week!
...and there you have it!

A few fast feathers around a swirl or fiddle head for the win!
Be sure to watch the video I shared above -- it always help to watch and learn.

And also be sure to jump over to Wendy's Blog to see what amazing stitching she is sharing this week.

Next week we're back to discuss binding, hanging and labels.

Then we'll take a week for ya'll to finish up before submitting your entries for the Sponsored Giveaways!

Have you visited our sponsors ?

Be sure to jump out to
Facebook or Instagram
and give them a "Like" or a Follow.
We wouldn't have great products or giveaways without our Sponsors! 

You can checkout the Giveaway Post
here ==> QAL Giveaway

If you have any questions, please leave them below -- I'll respond as soon as I can.

Happy Stitching!
Karen

*************

Learn more about how to use various thread weights in these Facebook Live Sessions
hosted by Aurifil at International Quilt Market: 

***
Follow me on social media:
Redbird Quilt Co. on Facebook, Instagram, Pinterest, Twitter, YouTube
Join my FMQ Frenzy Community Group on Facebook.
See my other Moda Bake Shop Recipes
Click here to see my upcoming events.
*
***  Guilds, Groups and Shops ***

I'm booking Lectures, Trunk Shows and Workshops
for 2020 and beyond!

If your Shop, Group or Guild is looking for programs or workshops I would love to hear from you.


Free Motion Quilting on Home Machines
Basics ~ A Quilters Doodles ~ McTavishing
A Full Day of Feathers
*
Aurifilosophy
*
Wool & Needle turn Applique
Technique or Project Oriented Workshops available.

Click here to see my upcoming events.
*
Send email inquiries to karen at redbirdquiltco dot com
or redbirdquiltco at gmail dot com


Note:  The FTC requires that I tell you.... I occasionally use affiliate links on my blog and website.  I may be compensated for purchases made using the links.  Rest assured I will only share sales and promotions for products I know and love myself.  Many thanks for your support of my very small business.

Monday, March 18, 2019

2019 Free Motion QAL Part 9: Narrow Sashing Swirls

Greetings !
Welcome to Part 9 of the 
2019 Free Motion Quilt Along
This week we're stitching the Narrow Sashing Areas...

I so enjoy spending time with
you and Lewe

I've also been having a blast stitching with my long term mentor and friend Wendy Sheppard.

Isn't Wendy's book amazing?
Have I mentioned I have a signed copy?
Yep - feeling blessed.  

This week was pretty exciting -- A big box of batting arrived from Quilter's Dream Batting for our QAL random giveaway!
Thank you Quilter's Dream...

Have you visited our amazing sponsors ?

Be sure to jump out to
Facebook or Instagram
and give them a "Like" or a Follow.
We wouldn't have great products or giveaways without our Sponsors! 

You can checkout the Giveaway Post
here ==> QAL Giveaway

Now -- on to the specifics for this week.

As I investigated the remaining areas of the quilt I decided that I'd like to take advantage of the narrow sashing area for a small repeatable filler.

Wendy has some neat swirl designs in her book on Page 34 "Swirls" and on Page 38 "Swirly Vine" and again on Page 46 "Jester's Hat".

I took a combination of these swirls and stitched out a straight-line variation of a design I refer to as
"Wild Goose Chase". 

You can see an allover background stitched with "Wild Goose Chase" in this free video tutorial for: 

For the narrow sashing I followed this straight line stitching plan: 

Swirl
 Backtrack
Swirl Opposite Direction
Backtrack 
Repeat

Don't be afraid to sneak around as necessary to stitch around and between all the panels.
It makes a beautiful framed accent.
I stitched the black dash area first (backtracking as necessary).

That allowed me to stitch around the entire outside area (red) in one continuous stitching path.
Of course when my needle is down I don't hesitate to twist my sandwich around so I have less quilt top to the right of my needle.  
PS -- I'm saving the remaining blue space for another design.

For consistency -- I continued with a 40wt Aurifil color #2024.
Here's a closeup:
Narrow inside sashing is complete here:
It may be helpful to mark a 3/4" or 1" line around the outside border of the panel (red lines above) before you stitch that space.  

Reference marks allow you to keep the design about the same size on the inside and outside areas.

This would be a perfect spot to use your Hera Marker to score the line...
Alternatively -- chose another marking tool to make your reference marks.
Sharing images of the corner transition below.
I started to the right edge...
(not much of a swirl is it?) 
and almost immediately went upward.
Do you see how easy it is to transition though?
This design allows you to change direction with ease.
Here's another example of a corner transition.
Backtrack or "Sneak Around" as necessary.
Gosh I love that texture !! 
More transition details...
And again...
This panel is so darn cute!
A counting sheep moment ;) 
Cliff recorded a short video of my stitching a bit of the design. 

Watch the video by clicking on the image below:
Was that helpful ?

Love the frame!
Speaking of counting... 
I choose to NOT worry about having the same number of swirls to the left and right of any space.  Just stitch them out ;) 
Love!
Love!
SO here we are -- the panel is nearly complete!

I'm so excited.

If you're just joining in the fun... 

Catch up with these Lessons: 

Jan 7:  Announcement Post  ✅
Jan 21:  Setup, Planning, Basting ✅
Jan 28:  Stabilization Quilting or Catch Up ✅
Feb 4:  Inside Center Panel ✅
Feb 11: Progress Pics ✅
Feb 25:  Top and Bottom Rectangles ✅
March 4: Top & Bottom Squares  ✅
March 11: Left & Right Panels  ✅

Next week we were scheduled to cover the outside border... but in reality we've decided to SPRING BREAK with everyone else... so we'll pickup the last 2 lessons beginning on April 1st.

March 25:  SPRING BREAK - CATCH UP
April 1:  Outside Border
April 8:  Binding, Labeling, Hanging if applicable

I can't wait to see what Wendy quilted.
You can jump over to Wendy's Blog <== here.

If you have any questions, please leave them below -- I'll respond as soon as I can.

Happy Stitching!
Karen

*************

Learn more about how to use various thread weights in these Facebook Live Sessions
hosted by Aurifil at International Quilt Market: 

***
Follow me on social media:
Redbird Quilt Co. on Facebook, Instagram, Pinterest, Twitter, YouTube
Join my FMQ Frenzy Community Group on Facebook.
See my other Moda Bake Shop Recipes
Click here to see my upcoming events.
*
***  Guilds, Groups and Shops ***

I'm booking Lectures, Trunk Shows and Workshops
for 2020 and beyond!

If your Shop, Group or Guild is looking for programs or workshops I would love to hear from you.


Free Motion Quilting on Home Machines
Basics ~ A Quilters Doodles ~ McTavishing
A Full Day of Feathers
*
Aurifilosophy
*
Wool & Needle turn Applique
Technique or Project Oriented Workshops available.

Click here to see my upcoming events.
*
Send email inquiries to karen at redbirdquiltco dot com
or redbirdquiltco at gmail dot com


Note:  The FTC requires that I tell you.... I occasionally use affiliate links on my blog and website.  I may be compensated for purchases made using the links.  Rest assured I will only share sales and promotions for products I know and love myself.  Many thanks for your support of my very small business.

Monday, March 11, 2019

2019 Free Motion QAL: Part 8 - Side Panels

Greetings all !
Welcome to Part 8 - Side Panels...
We're moving right along with our 
2019 Free Motion Quilt Along
featuring Lewe the Ewe
fabric panel by World of Susybee...

I must admit...  Wendy Ivory Spring and I are having just as much fun as you are!
I can't wait to see what fun and inspiring stitching she shares each week. 

Thanks for joining us.

Have you visited our amazing sponsors ?

Be sure to jump out to
Facebook or Instagram
and give them a "Like" or a Follow.
We wouldn't have great products or giveaways without our Sponsors! 

You can checkout the Giveaway Post
here ==> QAL Giveaway

If you're just tuning into the QAL it's not too late to join in the fun...

Catch up with these Lessons: 


Jan 7:  Announcement Post  ✅
Feb 4:  Inside Center Panel ✅
Feb 11: Progress Pics ✅
Feb 25:  Top and Bottom Rectangles ✅
March 4: Top & Bottom Squares  ✅

I think the feather panels are my favorite part so far... 

But today we'll cover:

March 11:  Left and Right Panels

Following right along from last weeks' "Simple is Good" motto...

I quilted the left and right panels with Pebbles and Echo stitching..

In Wendy's Stitching Pathways book you'll find pebbles on page 50 and echo quilting and outlining on Page 30.

For consistency -- I decided to continue with a 40wt Aurifil color #2024.

Here are a few images:


Be sure to follow Wendy's advice and stitch pebbles of varying sizes.
It adds much interest to the piece.

You can echo the ewe first -- or do it after you've stitched all the pebbles.


I didn't think it was necessary to stitch between each ewe -- but you can if you like.


Don't worry about filling up every small space.

As long as the spaces are small -- your eye will go to the pebble area.

Take your time, have fun with it.

If you need a few extra Pebble Tips -- visit the post I wrote about the Center Panel ...
where I included my tips and a YouTube video for pebbles.


That's it for this week... 
We're nearly done... Yippee!!

I can't wait to see what Wendy quilted.
You can jump over to Wendy's Blog <== here.

If you have any questions, please leave them below -- I'll respond as soon as I can.

Future Posts...

March 18: Narrow Sashing
March 25:  Outside Border
April 1:  Binding, Labeling, Hanging if applicable


Happy Stitching!
Karen

*************

Learn more about how to use various thread weights in these Facebook Live Sessions
hosted by Aurifil at International Quilt Market: 

***
Follow me on social media:
Redbird Quilt Co. on Facebook, Instagram, Pinterest, Twitter, YouTube
Join my FMQ Frenzy Community Group on Facebook.
See my other Moda Bake Shop Recipes
Click here to see my upcoming events.
*
***  Guilds, Groups and Shops ***

I'm booking Lectures, Trunk Shows and Workshops
for 2020 and beyond!

If your Shop, Group or Guild is looking for programs or workshops I would love to hear from you.


Free Motion Quilting on Home Machines
Basics ~ A Quilters Doodles ~ McTavishing
A Full Day of Feathers
*
Aurifilosophy
*
Wool & Needle turn Applique
Technique or Project Oriented Workshops available.

Click here to see my upcoming events.
*
Send email inquiries to karen at redbirdquiltco dot com
or redbirdquiltco at gmail dot com


Note:  The FTC requires that I tell you.... I occasionally use affiliate links on my blog and website.  I may be compensated for purchases made using the links.  Rest assured I will only share sales and promotions for products I know and love myself.  Many thanks for your support of my very small business.

Monday, March 4, 2019

2019 Free Motion QAL: Part 7 - Simple is Good!

Greetings all - Welcome to Part 7 of the
2019 Free Motion Quilt Along
featuring Lewe the Ewe
fabric panel by World of Susybee..

My dear friend and mentor Wendy Sheppard of Ivory Spring and I have teamed up to bring you this fun stitching event!

We have amazing sponsors including World of Susybee, Aurifil, Quilters Dream Batting, Hobbs Batting and Creekside Fabrics Quilts and Yarns.

Many thanks to our sponsors!!

Do checkout our Giveaway Post
here ==> QAL Giveaway
If you're just tuning into the QAL it's not too late to join in the fun...

Catch up with these Lessons: 

Jan 7:  Announcement Post  ✅
Feb 4:  Inside Center Panel ✅
Feb 11: Progress Pics ✅
Feb 25:  Top and Bottom Rectangles ✅

I'll share a few highlights:

This is how I stitched my center panel.
Learn more here>  Inside Center Panel

Last week we stitched those beautiful top and bottom rectangles.

Learn more
here > Top and Bottom Rectangles
Be sure to watch the YouTube video too!!
Fun with feathers!

Today we'll cover:

March 4:  Top and Bottom Squares

Over the years I've stitched a few Lewe blocks and this go-round I decided
 ...Simple is Better.

There really is no right or wrong -- and the key for our quilt along is to try different things.  So, although I quilted all my blocks similarly -- feel free to try new things in yours.

You can see a variety of stitching ideas for Lewe panels clicking this hashtag #longlivelewe from most any social media platform.    You can also try #worldofsusybee 

Here's a post I shared on Instagram from 2016 -- when we were in the middle of our 2016 Free Motion Quilt Along. 


Be sure to use Instagram and Facebook to your advantage.  Searching by hashtag is fast and easy and it doesn't limit results to the people you follow.

So... for the corner squares on this years panel I loaded thread that matched the background fabric and did some simple pebbles (Page 50), echo quilting and outlining (Page 30).

A few tips...

1. I generally start by outlining the subjects.

Using a heavy weight thread (28 or 12) helps the subjects POP off the fabric -- but note -- those threads also build-up quickly if you're doing a lot of dense quilting and/or backtracking.
In this case you may hear a few groans from your machine and have a little trouble on your hands.

For ease and simplicity -- I decided to go with a 40wt Aurifil color #2024.

If you're unsure what color of Aurifil to use -- check out my last post about weight and color options.

When stitching panels...

2.  Don't worry about stitching on the line -- stitch just inside or just outside the line.  It's so much easier to NOT have to stress over staying on the line.
 
I prefer to outline the head and ears to give them definition.

 If you like, stitch on his pretty lambs wool swirls too! 
I chose to NOT Stitch the swirls this time because I didn't want to flatten them.

3.  I love to use pebbles (Page 50) and echo quilting (Page 30) to make the bee look like he is flying.
(Meandering loops Page 31 work too!)

In each corner square I made a buzz trail with pebbles and then echoed the bee a few times to make him look like he's moving.

There are so many different ways to quilt these panels -- that is what makes it fun!

Although I used a thread color that matches the background fabric, it would also look beautiful quilted with one of Wendy's subtle colors -- or in #2600 Dove -- another favorite !
In the image below NOTICE how I drew the BUZZ trail of the bee with a purple pen before I started stitching 

This allowed me to start stitching in the lower right corner, going around the ewe and the flowers and working my way to the top left of the panel.

At the top left of the added the pebbles - the purple dots gave me a target area to quilt the pebble trail. From the pebbles on the left I worked to the right to finish stitching the bee and the echoes on the bee.
Here are the remaining corner squares.
You can see I followed the same format for each block.

1. Outline the Ewe body, head, ears
2. Outline the flowers
3. Outline the bee and add a pebble trail.
Optionally -- you can echo quilt to the outside edge of the block
AND you can quit those beautiful wooly swirls on the ewe if you so choose.

There are many choices -- do what looks good to your eye and know that with each area we quilt our skills improve.
Don't be afraid to backtrack.
Stitching in a continuous line without stops and starts is kinda freeing!
Challenge yourself to find a stitching path that will allow you to stitch end to end without cutting your threads.    This is where the backtracking or "sneaking around" on a previously stitched line comes in handy.

Stitching with thread that matches the background fabric allows you to quilt just outside of the line.   Do you see how, around the face, stitching off the black area allows it to POP a bit.
When you're learning, don't worry so about your stitch lengths.   You can see that mine vary -- but as long as the stitch is solid I just go with it.    

I tend to lean toward stitch lengths that are shorter (more stitches per inch aka SPI) so that the curves can be rounded and not choppy.  
That's it for this week... 
Yay - We tackled one more section of the panel!!

I can't wait to see what Wendy quilted.
You can jump over to Wendy's Blog <== here.

If you have any questions, please leave them below -- I'll respond as soon as I can.

Future Posts...

March 11:  Left and Right Panels
March 18: Narrow Sashing
March 25:  Outside Border
April 1:  Binding, Labeling, Hanging if applicable


Happy Stitching!
Karen

*************

Learn more about how to use various thread weights in these Facebook Live Sessions
hosted by Aurifil at International Quilt Market: 

***
Follow me on social media:
Redbird Quilt Co. on Facebook, Instagram, Pinterest, Twitter, YouTube
Join my FMQ Frenzy Community Group on Facebook.
See my other Moda Bake Shop Recipes
Click here to see my upcoming events.
*
***  Guilds, Groups and Shops ***

I'm booking Lectures, Trunk Shows and Workshops
for 2020 and beyond!

If your Shop, Group or Guild is looking for programs or workshops I would love to hear from you.


Free Motion Quilting on Home Machines
Basics ~ A Quilters Doodles ~ McTavishing
A Full Day of Feathers
*
Aurifilosophy
*
Wool & Needle turn Applique
Technique or Project Oriented Workshops available.

Click here to see my upcoming events.
*
Send email inquiries to karen at redbirdquiltco dot com
or redbirdquiltco at gmail dot com


Note:  The FTC requires that I tell you.... I occasionally use affiliate links on my blog and website.  I may be compensated for purchases made using the links.  Rest assured I will only share sales and promotions for products I know and love myself.  Many thanks for your support of my very small business.