Showing posts with label Winter Apple. Show all posts

Sunday, August 10, 2014

McTavish Review Winner!

Many thanks to all that participated in the Book Review and Giveaway of Karen McTavish's "Mastering the Art of McTavishing - 2nd Edition - Expanded and Revised" book !
Your feedback and excitement about learning to "McTavish" was amazingly uplifting and encouraging.

Machine quilting is one of my favorite things to do -- and this stitch is so very forgiving -- even if you "think" you can't do it I would love for you to give it a try.

The best tip I would share would be to use a thread that matches your background color, and that is  very fine, so that your backtracking and mistakes are nearly invisible.

Next, use the same color thread in the top and bobbin so that slight variations in tension do not show.

I always turn to Aurifil Mako Cotton 50wt thread for my top and bobbin.  Quilts like a dream!

Use a panel as a practice piece -- if you like it when you're done -- turn it into a wall hanging or Envelope Pillow (as shown below -- see the tutorial here). 
Dense McTavishing makes applique pop -- so it's an awesome background filler on applique quilts.  You can see before and after shots of Winter Apple (by Blackbird Designs) here.
And the movement that McTavishing provides in a quilt cannot be topped.  I love the way it worked out on my Redbird and Berries Mini Quilt -- a free recipe you can download from the Moda Bake Shop (click here).
So don't be shy about giving McTavishing a try -- it's versatile, forgiving, fun and just beautiful!
Now -- on to the winner of the book....   Rafflecopter chose the winner randomly and came up with
Marly !!  Congratulations Marly - I've sent you an email and will ship your book and DVDs out as soon as I hear from you.

** Many thanks to Karen McTavish and On-Word Bound Books for providing a copy of Karen's new book to review and giveaway **

You can order your copy of the book at On-Word Bound Books by clicking here.

Thanks again all for participating -- stay tuned for another upcoming giveaway and more fun!

Have a wonderful week.

Karen

Monday, December 2, 2013

Teardrops of Love - a needle turn applique tutorial - Part 1: Tools

Hi all -- today I'm thrilled to share Part I of Teardrops of Love - a needle turn applique tutorial.

I've had many comments and questions on my needle turn applique so in hopes of getting others to give it a try I've decided to write a multi-part tutorial on the topic.  My goal is to get others to fall in love with Needle Turn Applique as I have.


Before we dive into the details of Part 1, I would like to give special thanks to the two ladies from whom I learned Needle Turn Applique.  One of my very first quilting classes was a two day Hand Applique Retreat by Sharon Stroud (Click here for Sharon's Blog - She's out of her mind!).  Amongst many other things, Sharon is the author of "Dresden Plates of Distinction" published by AQS. I was fortunate to attend Sharon's Hand Applique retreat which focused on her Dancing Flowers design.  Sharon shares a wealth of information in this class -- I highly recommend taking any class from her. 

Below is a picture of my Dancing Flowers flimsy (I have yet to complete it -- but I do have a plan - you can see it here). 


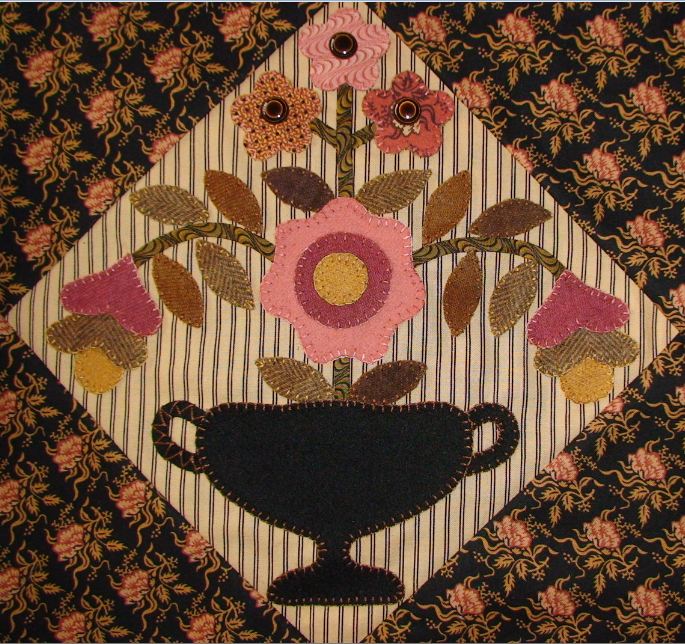
After a year of playing with Needle Turn applique I took another class at a different QS from instructor Debbie Wick.  Debbie taught "Winter Apple" by Blackbird Designs.  Debbie's method of needle turn is slightly different than Sharon's but the end results are just as beautiful.  Again I would highly recommend taking any class from Debbie. One of Debbie's beautiful cotton and wool applique designs was recently published in the Winter edition of Primitive Quilts and Projects Magazine.  You can visit Debbie's blog here.  Below is an image of one of my Winter Apple Pomegranates as taught and kitted by Debbie Wick:

Both of these special ladies have helped shape my quilting life -- I'm grateful to have learned from them. I cherish their skill, patience and guidance and I owe them a ton of credit.  They both have so much to offer to their students that I highly recommend you take a class with them if you're in the area.  Thanks again Sharon and Debbie.

Now, onto Part 1 of Teardrops of Love:  Tools  - a few of my favorite things

Fabric:  

Always, always, always use quilt shop quality fabric for hand applique.  Good fabric frays less and is easier to manage - not to mention how well it washes and wears.  Please consider that you're putting many hours into an heirloom piece that you want to last forever and ever.  In my opinion, high quality fabric is the only way to go. 

For this tutorial you'll use a fat quarter of a neutral background fabric and some 5x5 inch scraps of fabric -- I used one of my favorite French General Charm packs.

Marking Tools:

Always be sure that whatever you mark your fabric with washes, brushes, irons, or erases out without damaging the fabric.  I have had very good luck with the following tools:
  1. Soapstone - works great on darker colors, highly visible, brushes away -  find at Joann Fabric
  2. Sewline Fabric Pencils with Ceramic Leads - pink and yellow are my favorite - pink works great on lighter colors too
  3. Prismacolor Verithin pencils - metallic grey works great on light or dark fabrics
  4. Clover Hera Marker - for an extra "edge" before or after marking

We will talk more about the use of these tools in Part 2: Marking, Cutting and Basting Shapes

Basting & Cutting Tools:

You've probably heard me say this before -- I try to avoid glue and glue based products on my cotton and wool applique pieces.  So I'll avoid talking about them here and focus on what I do use:

  1. YLI Basting and Bobbin Thread - my favorite - it's inexpensive, works through fabric easily and will break and tear away if necessary
  2. Clover Applique Pins -- they are short and sweet -- great to tack your applique for basting or use for basting in a pinch
  3. Elan 4 inch Embroidery Scissors - they have serrated edges on them so your fabric won't slip while being trimmed -- I LOVE them !

Template Tools:

  1. Quilters Freezer Paper in 8.5 x 11 inch sheets works great for smaller designs and will feed through a printer if your pattern provides an electronic image.  If you have a large applique design you may use Reynolds Freezer paper or larger sheets of Quilters Freezer Paper.

2. Template Plastic -- if your applique has shapes that repeat often (like leaves or berries or flower petals that are re-used throughout your design), you may want to consider using template plastic.   I use Dritz and have sheets that are heat resistant and some that are not.

Sewing Tools:

Ahhh -- we're getting to the meat and potatoes now...
  1. Thread: <NOTE - This tutorial series was written before Aurifil announced their 80wt/2ply thread.  You need only use it once to realize it is the best choice for needle turn applique. >  I began my needle turn learning adventure using one of Mettler 60Wt/3ply fine embroidery thread or Aurifil Mako Cotton 50wt/2ply thread and match your applique colors.  Both worked very well.  I've tried others and let me say this: you'll be happy to go back to one of these if you try others ;)   
  2. Needles:  I've used a few different needles but I always seem to come back to John James Sharps Size 11.  Remember with these needles the lower the number the smaller the needle. Use the smallest size needle that you can handle comfortably.  I've used smaller ones in the past but I sometimes get cramps in my hands while sewing -- the JJ size 11 Sharps work best for me.
  3. Needle Threader -- "Ultra Fine Threader" - - I know there are "automatic" ones in the market place, but these little devils work great, they are easy to transport and use!   Seems my eyes have more trouble each year getting those small threads into the small eyes of the needles.  The Ultra Fine Threader works like a charm.
 

Optional Tools:

These tools can be a little pricey when you're first getting started -- so ease into purchasing them when you can spare the $$.  I would recommend that you do plan to get them as they will make your applique experience more enjoyable.
  1. Dritz Quilter's 3-Way Sandboard:  this board helps hold your fabric in place while it's being marked.  Without the sandboard it's more likely that your fabric will get a little wonky while your marking it (it may stretch and loose its shape).

2.  June Tailor Quilter's Cut 'n Press 1:  This small board has an ironing surface on one side and a cutting surface on the other.  It is perfect to rest your applique on while you are stitching.


Thanks so much for sticking with me as I ramble on about my favorite tools!     I will talk about the use of these tools in subsequent parts of this tutorial.  In the meantime, if you have any questions please leave me a comment or send me a message.

Stay tuned next week for Teardrops of Love Part 2: Marking, Cutting, and Basting Shapes.

Have a wonderful week all -- I leave you with one of my most favorite front yard Cardinal photos:
 
Hugs,
Karen

PS. As soon as I figure out how to do it I will attach a PDF version of the Tutorial Sections on my sidebar.  Thanks for your patience.

Wednesday, October 30, 2013

Work In Progress Wednesday - Winter Apple

What an awesome few days it's been since my Family Tree Quilted Pillow was published on the Moda Bake Shop -- I really couldn't be more honored!

It's so much fun to see how quilters react, what they like, what catches their eye, and what is meaningful to them.  I want to thank everyone for your "Oh so kind" comments!  Thank you, thank you !

I'm replying to comments via email, so if you haven't received a reply from me you may be a "no-reply" blogger :(  Click here to learn more about no-reply settings.  Also, please send me your email address so I can write back AND be sure you're entered into the giveaway for the awesome Family Tree fabric!   Thank you.  ** Sunday, November 3rd 11:50pm, the giveaway is now closed and a winner will be announced Monday November 4th - thanks to everyone who entered and left such wonderful feedback **

Now back to Work in Progress Wednesday -- do you remember this little gem?
"Winter Apple" by BlackBird Designs...   Read more about Winter Apple here.
Winter Apple Stitching Last Pomegranate - 8/30/13
I started this Needle Turn applique a v-e-r-y long time ago and was thrilled when I finished the flimsy mid-September.

It's been laying around on a spare bed, layered with Hobbs Heirloom Premium Wool Batting and a pretty little Primitive Gatherings backing for more than a month now.  I guess I was a little busy with a fun tutorial ; )

Winter Apple Flimsy -  9/18/13
I'm happy to report that I found about 8 hours this past weekend and was successful in basting and quilting the Winter Apple background.  Woohoo !!


Sure hope ya'll aren't getting bored with Karen Miller's "McTavishing"; it had been my plan all along to McTavish this little piece.   I'm pretty happy with how it is turning out. 


I started in typical Free Motion Style with my darning foot on, feed dogs dropped and a Queen Supreme Slider on bed of my machine. I stitched in the ditch around the outside all of the applique before doing any background quilting.

Stitching the applique ditch 10/27/13
 I regret to say that I did NOT use Aurifil thread on this piece and I'm kicking myself for that. It's hard to see in these shots but the quilting thread I used was just too heavy and didn't lay down as nice as the Aurifil.
A Lesson Learned and Noted...

More to do: You can see that I've yet to do any stitching on the applique -- It hurts to think about... I'm having a hard time bringing myself to stitch on it -- I will, one day soon, stitch in the ditch of the inside applique layers and then stitch an inside echo stitch on the applique as well.  That's my plan !  (Convincing myself).  Thanks Debbie and Bonnie for sending pictures of your completed Winter Apples.


Before I do anything else though -- I guess I should fix this little boo-boo. 

Ooops...  better get the ripper out!
 More lessons learned:   Take your time, check your backing fabric, and don't stitch after 11pm ;)

I hope you enjoyed my progress today -- I'm still having fun !!


Linking up to some great Work In Progress Linky Parties -- you can check them out on my sidebar!  Click around to see some beautiful creations in progress.


Have a wonderful day! 

Hugs,
Karen


Wednesday, September 18, 2013

Winter Apple Flimsy is Done and a Celebration!

It's not pressed, it's not layered, but the quadrants are sewn together and the applique is complete!!

Yippee!  

Now for layering and basting!  I can't wait to get this top under my domestic machine for quilting


Now let's talk about the celebration!  

My good friend Debbie Wick is celebrating her first ever published pattern!  How about that for exciting!!

The patten "Pomegranate Holiday" will be published in the Winter issue of Primitive Quilts and Projects Magazine !  

Wait until you see this unique table topper -- it's a beauty !!   Debbie has a wonderful way of working with wool/cotton combinations - - and she included one of my favorite things in her pattern.  I won't give it away but this issue is a must have !!

Congratulations Debbie!  Well deserved!

Visit Debbie's Blog and leave a comment  for a chance to win a full Year Subscription to Primitive Quilts and Projects !!  Tell her Karen sent ya!

Thanks for stopping by today and have a wonderful week!

Hugs,
Karen 

Wednesday, September 11, 2013

9.11 and Work In Progress

I have a lot to be excited and thankful for in my quilting world this week!

First, the needle turn on all four quadrants of "Winter Apple" by Blackbird Designs is done! {Happy Dance}... I'm ready to sew them together, add two more appliqué pieces in the center, then baste and machine free motion quilt!  Woohoo!  You can read progress notes about Winter Apple here, here, and here.


Next, and this is something I've wanted to do for  Y-e-a-r-S!   Tonight we have our first meeting for Quilting The Garden!  


This has to be one of the most beautiful appliqué quilts I've ever seen.  I will talk to my friend Debbie (who is guiding three of us through the process) tonight to post pics of her completed quilt!  It is just beautiful.

Above is my current take on background fabric and main border fabric.  These may change tonight when I get together with Debbie, Bonnie and my sister Janet...

Notice that top background fabric, the pink ticking?  It is a very old fabric and I've looked high and low for it.  If anyone ever stumbles across yardage I would LOVE to purchase some!  Having eyes and ears on the street makes a difference!  Thank you!

Lastly,  I finished my Kim Diehl "Penny Garland" Wool table topper...   Here I have it draped over the back of my couch... I just can't seem to get the right lighting to show the rich background fabric...  It still needs a label.
You can see other posts of  "Penny Garland" here, here, and here.   Love this little item!

One last thing...  here is my husband raising the American Flag lakeside this morning...
We will never forget this day in the States... September 11th... Those who lost their lives are always in our hearts and prayers.  World peace...  that is something we can all be hopeful for... in my thoughts...

Thanks for stopping by today, stay cool, safe and keep quilting!
Hugs,
Karen

Linking up to my favorite Linky Parties today -- check out my sidebar and see some fantastic projects !

Wednesday, August 28, 2013

Work in Progress - Winter Apple Needle Turn Appliqué

By Blackbird Designs...  Was started more than two years ago and I'm thrilled to report that I'm nearly done with the 4th quadrant of this awesome Lap quilt!
I just LOVE the fabrics and the pattern of this piece.  I was lucky to have attended an appliqué class taught by a good friend, Debbie Wick.  You can see Debbie's finished Winter Apple here.

Isn't Debbie's piece beautiful?  She had her piece quilted by an amazing long arm quilter locally.  I only hope that mine will finish as beautifully as hers. On this piece I plan to outline stitch all of the appliqué and then have a hand at a little More McTavishing!  Woohoo I'm so excited.

Below is pomegranate #2 on the final quadrant just waiting to be stitched.
Here is quadrant #1 which was finished a LONG time ago and is therefore very wrinkled.
Here is quadrant #2... And there is another one just like it completed as well.
I'm thinking this weekend I'll stitch, stitch, stitch and get this flimsy done!

I am using Mettler #60 fine embroidery thread and some Auriful #50 as well.

I am also using Clover Gold Eye Appliqué Needles (No. 12) 

I mark my darker fabrics with soap stone and use Sew Line or Primsacolor Verithin pencils... Both are awesome!

Thanks for stopping by today! 
Karen

Wednesday, February 29, 2012

Work in Progress Wednesday

Happy Leap Day Everyone !!   We have at least two local quilt shops with 29% off today and many more sales on the Web... This "extra" day of the year is welcome ! 

I made great progress this week -- stitching completed on "Yesterday Remembered" by Kim Diehl.   I can't decide on which handle stitch I like best.  The pattern calls for the cross hatch -- but I wonder if it makes the handle too prominent ?  Also need to make up my mind on the flower centers - neither choice tickles my fancy...  What do you think ?

Next class we will hand quilt it -- and then it will be framed.  It's going to be beautiful when completed !

My Bird Pin Keep -- hasn't changed - He awaits some buttons or wing stitching, eyes, and anchoring -- I've been a little busy with a few other projects  ; )

On a good note though -- I put the finishing touches on Quadrant #3 of  "Winter Apple" by Blackbird Designs -- I JUST LOVE this table topper! See a finished version on Debbie's Blog -- Debbie's work inspired me to take this class where she had put aside all the same fabric that she used on her demo piece -- isn't it lovely ?   Needle Turn Applique is my favorite !

I also worked on "Flower Baskets" by Wooden Spool Designs.  Only 6 blocks of all wool applique - using a blanket stitch or an overhand stitch -- it's easy peasy !!    Wool applique and watching the Daytona 500 go hand in hand (especially with all those Yellow Flag race delays !!)


I managed to stitch an entire block during that race !!  Here (above) is a before and after shot of a single block...   Sew much fun !  Once all the wool is appliqued I'll add the embroidery (stems).  I need a little practice with my embroidery -- but I have two great teachers -- my sister Janet and my friend Debbie !!  Lucky Me !


Below are some snippets of some other special things I'm making this week (shhh... it's a surprise so I'll show you the finished products next week!!)


Last, but not least is one of the "most important" WIP's.  This is our youngest granddaughter Angelina, 7 years old. For Christmas we gave her "My First Sewing Kit" and last Saturday we worked on her stuffed cat project.  She did great and absolutely loved having something to focus on while her (4) brothers romped and played with Grampa !!  She did all the sewing and stuffing.  Isn't it cute?  Love, love, love to sew with those grand girls !!

Thanks for stopping by and have a special day !!

Karen

PS - linked up to Esther's WIP Linky Party !  Check out all the great work in progress there -- not to mention that Esther has kicked off her new Free Mystery Block of the Month "Forget Me Not".