Monday, January 28, 2019

2019 Free Motion QAL: Part 2 Stabilization & Catch Up

Greetings!
Welcome to Part 2 of the 2019 Free Motion Quilt Along featuring Lewe the Ewe fabric panel by World of Susybee!
I'm so excited to share this quilting time with YOU and my dear friend and mentor Wendy Sheppard of Ivory Spring

Thank you for joining us. 

If you're just tuning in to the QAL it's not too late to join in the fun.  We're very early in the process and there's plenty of time to jump on board.

2019 FMQAL Schedule:    

Jan 7:  Announcement Post  
   Jan 21:  Setup, Planning, Basting  
🠞 Jan 28:  Stabilization Quilting or Catch Up 🠜
Feb 4 & Feb 11:  Inside Center Panel
Feb 25:  Top and Bottom Rectangles
March 4:  Top and Bottom Squares
March 11:  Left and Right Panels
March 18: Narrow Sashing
March 25:  Outside Border
April 1:  Binding, Labeling, Hanging if applicable


These posts outline Fabric & Notion Supplies necessary for the QAL.

As mentioned in the announcement we'll be referencing Wendy's awesome book, Stitching Pathways, to help create our motifs and get accustomed to the process of Free Motion Quilting.
Additionally, I'll be using my thread collection, The Subtle Sampler, for most of my stitching.

Looking for more details about the supplies necessary to quilt along, click here. 

Need to purchase supplies ? 
Check with your favorite local shop or 
visit our Participating Shops link == > here.

Did someone mention Giveaway?
Click "here" to learn about our sponsors & available prizes.  
Be sure to visit regularly to see updates to the Prize Packages.  


Stabilization or Catch Up

What is stabilization? 

Stabilization is part of the quilting process that focuses on stabilizing or keeping square the 3 (or more) layers of the quilt prior to beginning to free motion quilt them.

This step is done after basting and is considered part of the quilting process.

It generally involves quilting straight stitches in or around a block - but it could also be done by free motion stitching in or near an applique ditch.  

If quilting a block-based quilt I would consider stitching in the ditch of each block (or, in my case just outside of the ditch) as part of the stabilization process.

For a quilt with many borders -- stitching near or in the ditch of the quilt borders would be considered stabilizing the quilt. 

Here are a few examples where I've stabilized or top-stitched on other Susybee panels.

~ Lief the Caterpillar ~

On this Lief baby quilt I top stitched along the bottom border in white.
It looked so nice I decided to stitch 2 rows of white.

Also -- I top stitched inside of the black sashing with a black 12wt thread.
Stabilization helps keep the quilt or subsections of the quilt "square" -- it keeps them from getting wonky during the quilting process.

~ Zoe ~
One of my favorite Susybee Characters...
I stabilized this growth chart quilt with top stitching.
I stitched around the first 2 small borders.
Love the look!!
 Here's another view...

One Thing To Note: 

Before you begin your stabilize stitching be sure to baste it well -- otherwise -- you may have trouble with fabric gathers as you near the inside edge of your stabilization quilting.

See my basting recommendations in Part 1 -- Click here!

Also note... stabilization is not always necessary and not all quilters do it.  

For me though I really enjoy the stabilization step. 

Some of this LoVe comes from wanting to use my awesome stash of luscious Aurifil threads!!

Another reason I enjoy this process is because I've released myself from having to stitch "in the ditch". 

 Instead, I use that beautiful 12Wt thread and stitch next to the ditch.
 It's so much easier and the thread looks awesome !!

Here's a sample on the Lal the Lamb Growth Chart for World of Susybee.

Let's talk details...

When I want the stitches to show I choose
Aurifil 12Wt Cotton Thread!

I love working with it.

It's heavy and has amazing luster and shows-off a beautiful top stitch.

For this quilt I decided to use color #6722 from The Subtle Sampler

To successfully top-stitch with Aurifil 12Wt  you'll want to have a Superior Titanium Coated Top Stitch Needle size 90/14 or 100/16.

The Top Stitch Needle has an elongated eye and a shaft down the front of it!
Trust me...  this needle makes a
-- HUGE --
difference for top stitch and free motion quilting.

If you're experiencing any trouble at all with your stitching this needle is a MUST HAVE!
In the bobbin I generally use Aurifil 50Wt thread because it's more economical than heavier weight threads.

That's right, for the same price you get more yards of Aurifil 50wt on a large spool (1422 yards) than any other weight..

  Also -- that fine weight thread makes your bobbin last longer!

I stitched most of this project with Aurifil 50Wt color #2312 in my bobbin. 
You'll find this weight and color in The Subtle Sampler.

This color goes nicely across several different top thread colors.
It's my favorite bobbin thread weight and color.

NOTE:  You might find the 50wt too fine for your style of top stitching with 12Wt.

A good indication is thread breaking at the needle or under the throat plate.
 In this case try a heavier weight thread in the bobbin -- I would go one weight thicker with Aurifil 40wt.

Next -- Use a walking foot for your top stitch. 

Some manufacturers call them even feed or dual feed feet. 

They're made to walk multiple layers of fabric through the machine without bunching or pushing.   

Top Stitch with your feed dogs UP.

Set your machine to a Straight Stitch with a length of 3.50 or more -- this way you can admire the beautiful stitches coming your way.

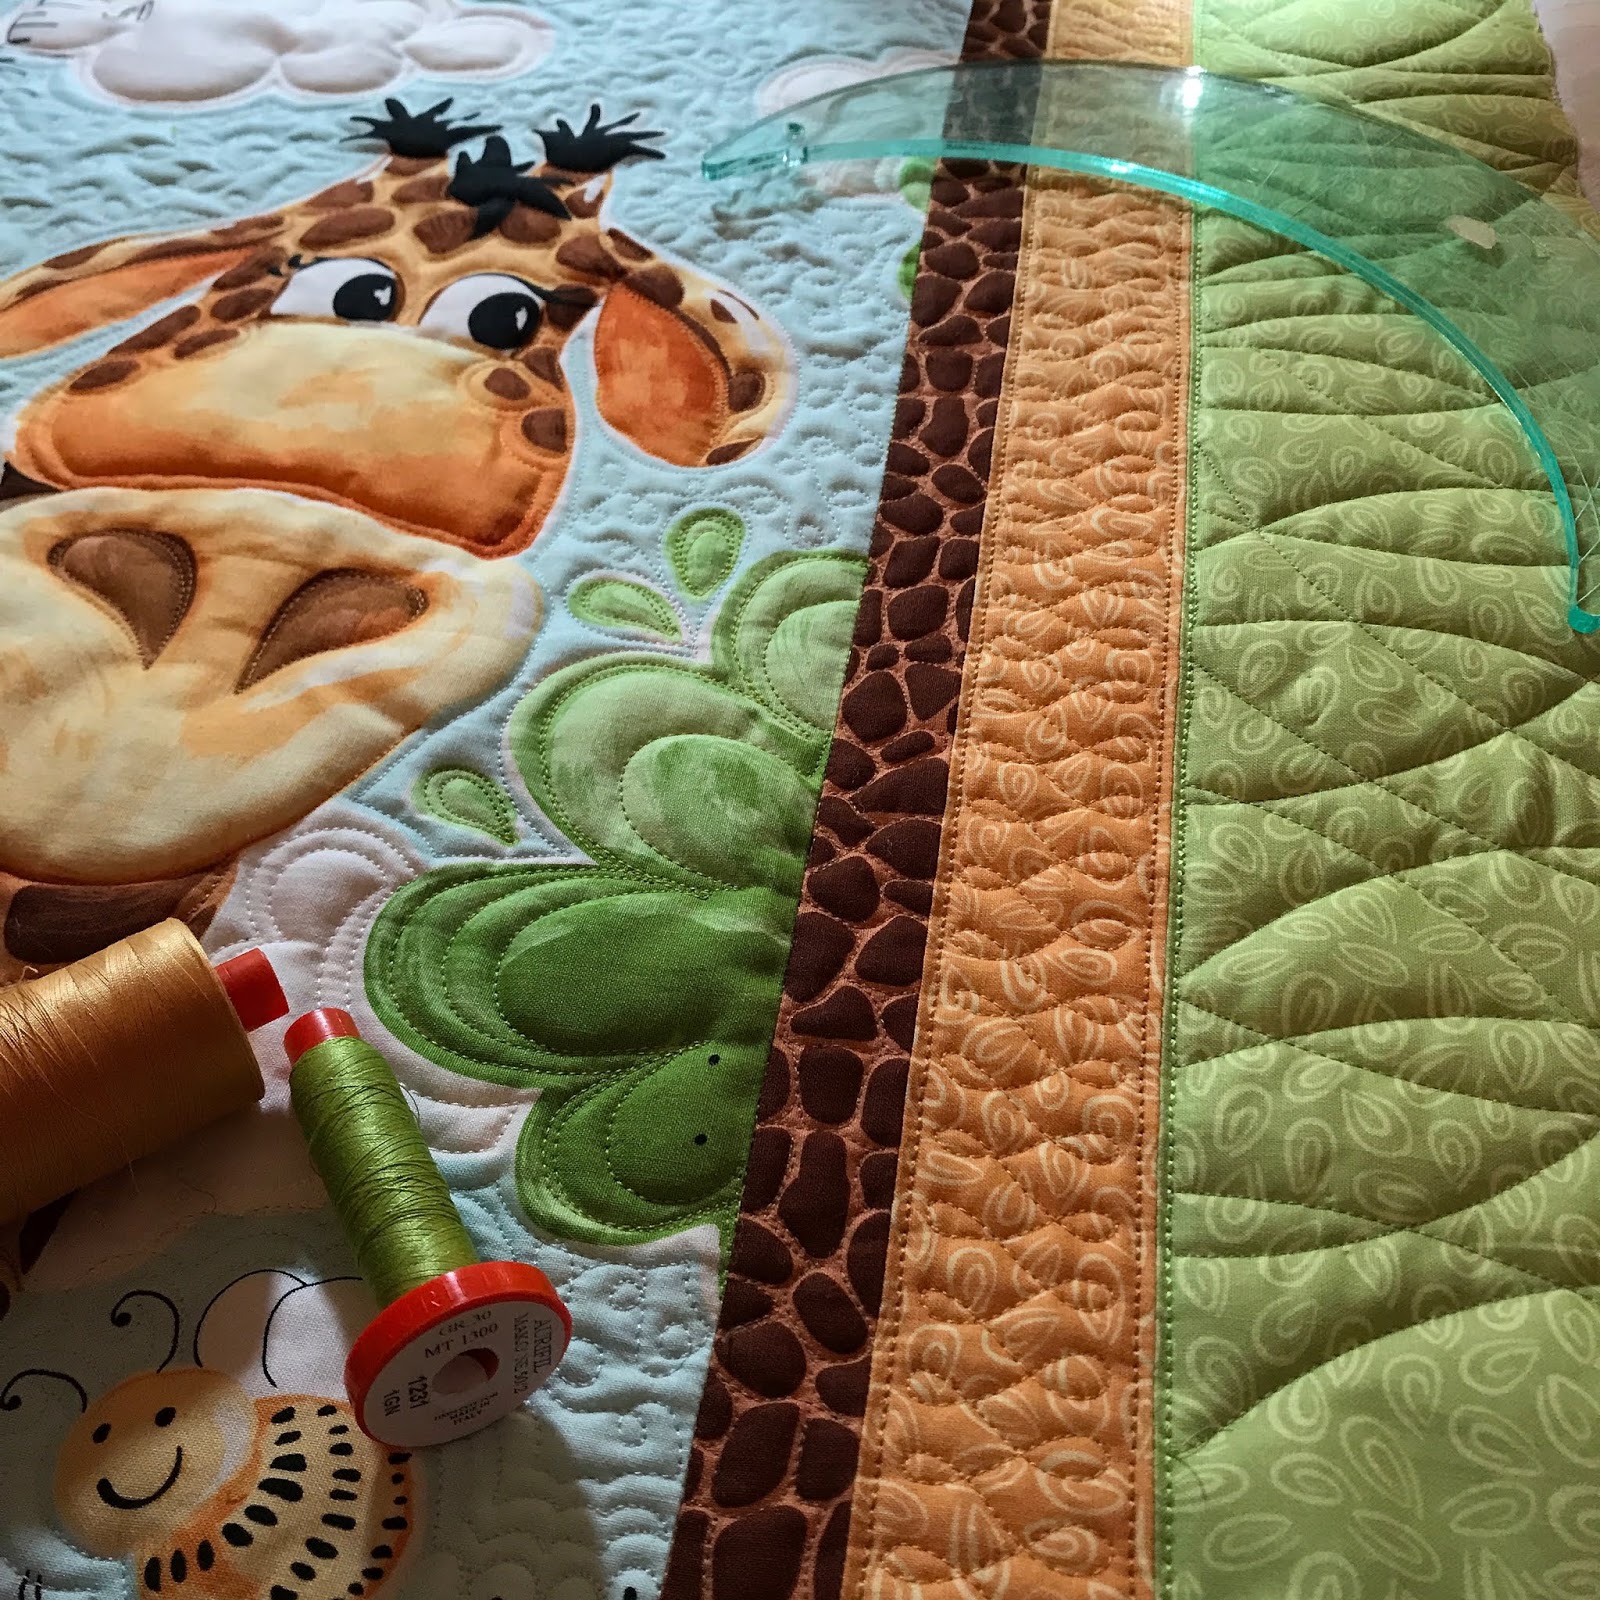
On this panel I decided to stabilize around every panel square or rectangle -- but not along the outside edge. 

I stitched on or near the dotted line on the white edge of the panel squares.


To get started with your straight stitch quilting be sure to bring the bobbin thread to the top.

Set your stitch length down very low (I set mine to 1.0) and take 5 or 6 stitches at this length.


Now set the stitch length back to 3.5 or higher and continue stitching around the design. 

*  Stitch Slowly *

The Aurifil 12 wt thread is a hand embroidery weight thread -- it's not made to take high tension or high speeds.  

Take your time and admire how beautiful those stitches are.

When you  make it around the entire square or rectangle and are nearing the beginning small stitches,  stitch over them with a few of the 3.5 length stitches.

End your stitching by setting your stitch length back down to 1 and taking another 4 or 5 stitches to lock them in place.

Move on to the next square or rectangle and repeat the process:
Bring bobbin thread to top
Set stitch length to 1
Take 5-6 stitches 
Set stitch length to 3.5 
Stitch around the area...
Finish off with 1.0 stitches to lock.


Isn't it beautiful?

Don't worry about the spacing as it relates to the black dots on the panel. 

The Panel prints are rarely ever perfect -- just do the best you can.  
NO-One will notice.

I use my Machingers gloves during this process and take care to ensure my fabric does not have a drag.

The Walking Foot and Long Stitch Length will work wonders if free of drag.


Here it is - the entire panel with the Stabilization Top Stitching done!

Sew Much Fun!

Well -- that's a wrap for this weeks session.
Be sure to jump over to Wendy's Blog and see what she's up to this week.

If you have any questions, please leave them below -- I'll be sure to respond as soon as I can.

Happy Stitching!
Karen

*************

Learn more about how to use various thread weights in these Facebook Live Sessions
hosted by Aurifil at International Quilt Market: 

***
Follow me on social media:
Redbird Quilt Co. on FacebookInstagramPinterestTwitterYouTube
Facebook my FMQ Frenzy Community Group
See my other Moda Bake Shop Recipes
Click here to see my upcoming events.
*
***  Guilds, Groups and Shops ***

I'm booking Lectures, Trunk Shows and Workshops
for 2020 and beyond!

If your Shop, Group or Guild is looking for programs or workshops I would love to hear from you.


Free Motion Quilting on Home Machines
Basics ~ A Quilters Doodles ~ McTavishing
A Full Day of Feathers
*
Aurifilosophy
*
Wool & Needle turn Applique
Technique or Project Oriented Workshops available.

Click here to see my upcoming events.
*
Send email inquiries to karen at redbirdquiltco dot com
or redbirdquiltco at gmail dot com


Note:  The FTC requires that I tell you.... I occasionally use affiliate links on my blog and website.  I may be compensated for purchases made using the links.  Rest assured I will only share sales and promotions for products I know and love myself.  Many thanks for your support of my very small business.

Monday, January 21, 2019

2019 Free Motion QAL: Part 1 - Lewe Setup, Planning, Basting

Hello all and welcome to Part I of our 2019 Free Motion Quilt Along (2019FMQAL) featuring the Lewe the Ewe fabric panel by World of Susybee


I've teamed up with my dear friend Wendy Sheppard of Ivory Spring for this fun quilting adventure. 

We're really excited to have ya'll on board.  Thank you for joining us. 

If you missed the 2019 FMQAL Announcement posts you can find them by clicking the links below. 

These posts outline Fabric & Notion Supplies necessary for the QAL.

As mentioned in the announcement we'll be referencing Wendy's awesome book, Stitching Pathways, to help create our motifs and get accustomed to the process of Free Motion Quilting.
Additionally, I'll be using my thread collection, The Subtle Sampler, for most of my stitching.

Looking for more details about the supplies necessary to quilt along, click here. 

Need to purchase supplies ? 
Check with your favorite local shop or 
visit our Participating Shops link == > here.

Did someone mention Giveaway?
Click "here" to learn about our sponsors & available prizes.  
Be sure to visit regularly to see updates to the Prize Packages.  

2019 FMQAL Schedule:    

Jan 7:  Announcement Post  
 🠞  Jan 21:  Setup, Planning, Basting  🠜
Jan 28:  Stabilization Quilting or Catch Up
Feb 4 & Feb 11:  Inside Center Panel
Feb 25:  Top and Bottom Rectangles
March 4:  Top and Bottom Squares
March 11:  Left and Right Panels
March 18: Narrow Sashing
March 25:  Outside Border
April 1:  Binding, Labeling, Hanging if applicable

Setup & Planning

OK!  Let's get this QAL show on the road!

Setup -- Some of you may think it's not important to talk "setup" -- but really -- I think it's one of the most important topics for free motion quilting success.

I share details of my machine setup on several posts from LONG ago. 

Links to these posts and corresponding videos outlined below.
BE SURE -- to review and watch them. 

If you're anxious to learn and be successful at FMQ -- setup is key.      

Also -- for this section take the time to read and digest the first 20 pages of Stitching Pathways.
Stitching Pathways - Partial Table of Contents
Wendy shares a wealth of information there-- you don't want to miss ANY of it!!

Also note -- although Wendy and I agree on many aspects of  Free Motion Quilting -- our approaches vary at times.
(Imagine that !!) 

I'll be sure to point out those areas where we may differ in opinion and personal preference.

Rest assured -- there is no RIGHT OR WRONG with FMQ.  It's all about finding what works best for you and your style.  It's a good thing to show differences -- it gives you options for success! 

We gracefully and respectfully accept our differences.  Love that woman!

*
Let's talk machine setup from my point of view... 

You see -- I'm a firm believer that your "setup" aids in your success!

I use a Janome 7700 for most of my machine quilting -- but honestly -- I'll be the first to say that you can stitch on any machine -- really!!     Wendy uses a Bernina - I use a Janome - both machines are awesome!
When I travel and teach I may teach on a Handi Quilter or a Baby Lock or a Pfaff or any number of other machines.  The key is the setup... 

Here are a few things I feel are really important:

The first item is:  Having the bed of your machine be flush with the table top.   I don't have a big studio -- matter of fact my studio moves between home and the cottage quite regularly.  In order to accommodate my traveling lifestyle I purchased a Gidget II table by Arrow.  


It allows my machine to sit flush with my table top.      


I share more images and a complete explanation of my quilting area setup on this blog post

And while you're there be sure to view the corresponding 2016 QAL YouTube Video that discusses setup, my favorite notions and also runs you through a suggested practice session.    

Leave feedback below if you have questions on any of this.

The other items are:  Thread, Needles, Darning Feet & Gloves

From the above post and YouTube Video you learned of a few of my favorites AND why! 
Let's do a quick review:

Thread

Aurfil thread is by far the best cotton thread on the market.  
I've been successfully using it for years! 
This high quality 100% Egyptian cotton thread has amazing sheen, minimal lint, and stitches beautifully.

Combine that with 270 choices of color and 5 different weights of 2 ply thread it makes an exceptional choice. 


High Quality Thread makes a big impact on successful quilting. 
This is something that Wendy and I strongly agree on!

I so often hear "I can't believe changing the thread could fix my issues".
It's true -- using a high quality thread (with high quality fabric and batting) can make a world of difference. 

Wendy and I recently joined forces with 19 other amazing makers to share our love of thread in a new program called Aurifilosophy. 
We teach at shops, guilds and private groups -- yep we are Aurifilosophers ! 
You can read more about the Program here.

I was honored to be offered an opportunity to create my very own Aurifil collection in 2017 -- this is when I curated The Subtle Sampler. 

Many of the threads I use for the FMQAL are included in The Subtle Sampler.  

I'm excited to share my choices in color and weight with you during the Quilt Along.  Thread education is one of my favorite things (besides FMQ) to discuss.    


Here's a quick view of the thread colors and weights that are in The Subtle Sampler.

Notice that Aurifil's thread spools are color coded by weight! 
At a quick glance I can understand weight and color without looking at the label.

Needles

Superior Titanium Coated Top Stitch Needles have grown to be my favorite needle.  
You wouldn't think that a needle could have much of an impact on the success of your quilting -- but I'm here to say it can.  

The top stitch needle has an elongated eye and a groove down the entire shaft.  It gives your thread a fighting chance when quilting through multiple layers of fabric and batting.  I LOVE these needles. 

If you are experiencing any trouble with breakage, skipped stitches or shredding --  give them a try!   I purchase the assortment pack because having the right size needle to match your thread weight is important.  
On this free reference sheet I share thread weight to needle size comparisons and also discuss tension adjustments that may be necessary when you change thread weights.  Download the guide for all the details.

Free Motion or Darning Feet


  Another important aspect of my quilting adventure is my foot.  I really dislike stitching with a foot that is rectangle or oval.  Personally I love a foot that is rounded or open toed (a horseshoe shape).


 The rounded nature of the foot helps me think round and stitch round. 
See this informative blog post from 2014 -- where, early on in my stitching & educating adventures I talk about the basics of FMQ.

I chat other setup basics in the 2016 FMQAL Post and YouTubeVideo  mentioned above. 


Gloves:  

I love to stitch with Machingers Gloves.  Wendy and I have a slightly different approach here.  I keep both of my hands on the quilt top - using my fingertips to control the movement of the sandwich.   With the lightweight, yet gripping Machingers Gloves, I can control the sandwich so it doesn't control me.   

Be sure to purchase the smallest size gloves that comfortably fit your hands.   It's nice to be able to leave them on when changing a bobbin or needle.  Excess fabric in your fingertips is NO FUN. 

Batting:

  My go-to batting to add amazing loft to any project is Quilters Dream Wool batting.  
It really does "Quilt Like a Dream".


There's minimal shrinkage and it can be machine washed and dried
 (albeit on cool temps) .  
You can read more about Dream Wool by clicking here.
A Crib size piece of batting is perfect for this project (60" x 46").

If you prefer to avoid using wool -- consider using Quilters Dream Blend or Dream Cotton.

Now -- Let's Talk Basting!!


 Wendy has some great information on basting in her book -- check out page 17 for that information.  We have very similar approaches to basting.  

It's important to always cut your batting and backing a few inches larger than the quilt top.  This affords us something to hold on to when nearing the edge of the quilt top.

Also for ease of placement and taping, after pressing, be sure to have straight and square lines on your backing fabric.

Begin the basting process by positioning the backing fabric -- right side down -- on a table top or large flat surface.
Tape one side down.  
I use blue painters tape and attach every few inches.
The painters tape does not leave residue on my table top.

Now smooth the fabric in the direction opposite of what you taped and tape another edge of the backing.

The key is to ensure there are no gathers in the backing. 
If I run my hand over the backing and a ridge is created ahead of my hand then it needs to be more taut.  

You can read this blog post and watch this video from my 2016 FMQAL for great detail about basting.

Once the backing is ready I place the batting over it and smooth it out.

For this FMQAL I choose to use 1 layer of Dream Wool.

 Next I position the quilt top on the batting.
Again I smooth it out -- from the center in an outward moving motion.

Now I grab my basting pins by Dritz.  I generally use the smaller pins to baste.  But I do own larger ones too.  The smaller ones don't get in the way as easily as the larger ones do.
I may choose the larger one when I pin the center of a subject I know I won't be stitching right away.

Notice how the basting pins have a slight bend in them.
This enables you to easily scoop-up all layers of the quilt. 

I start pinning from the center of the sandwich outward -- smoothing as I go.
You'll notice in my images that I do not close my pins -- I save that step for later because it's a more efficient use of my time.

You can find MUCH MORE DETAIL about basting in this blog post and by watching this video from my 2016 FMQAL.

One of the reasons I pin baste is because it allows me to "think" during the process.

I'm thinking about where I will begin quilting.
I try avoid pinning there. 
I rarely start quilting in the center of a subject.  So this is a safe place to pin.

Second, through the entire pinning process I think about "How to Quilt That".... 

Pinning gives me time to inspect every few inches of the quilt top. 
I really LOOK at the fabric -- I try to let the fabric speak to me as I pin. 

This part of the process helps me begin to decide what motif(s) to use for the quilting.

I'll will chat more about motif and thread color and weight selection as we stitch along -- but if  you would like to understand my thoughts on this from our 2016 QAL -- read the blog post here and view the video here.

When pinning I choose to pin about a fist width apart.   I don't generally use any pattern to pin -- just start in the center and work my way outward, smoothing and pinning as I go.

When I'm done pinning I use my favorite tool, the Kwik Klip to close all the pins.
It's an efficient way of getting them closed and saves your finger tips too!  
Check out my this video to see it in action

So -- I work from the center outward, smoothing and pinning as I go.
I try to avoid spots where I know I will begin stitching.

In next weeks' post I'll show you how I stabilize the quilt top with a top stitch.
Because of that I avoided pinning along the outside of each section of the panel.


One more thing I do in the Setup, Planning and Basting phase...
I  "audition" available thread colors and weights to make sure I have what I need.

To audition a color it's best to unwind some thread from the spool and place it over the section you want to stitch.  The thread color takes on a whole different look once it is unwound.


I generally stitch with thread colors that complement the fabric.
I will often vary the thread weight to achieve a focus effect.  


In the sample below -- the 40wt color #5004 seems a little to "much" for quilting the border on Lewe.
I probably would not stitch with something with this much contrast.

In The Subtle Sampler -- color #2000 would work fine here -- or, if you have a stash of Aurifil one of the white/ecru colors would work fine too. 


Next week we'll talk stabilizing the quilt.
I love to use a heavy weight thread (12 wt) and top stitch for stabilization.
It works beautifully and looks awesome.

This 12wt thread (red spool) in color #6722 from The Subtle Sampler will work just fine.
Note though, you'll need to have one of those top stitch needles (mentioned above) in size 100/16.
If you don't have these supplies -- no worries.  Just use what you have for now and it will work out just fine.  It's a learning process -- when you have time and funds to experiment -- do it then!

Be sure to jump over to Wendy's blog post and gobble up what she is sharing.
What a great opportunity to learn from a master.

If you have questions -- leave them below and check comments later for an answer. 

We may also be discussing the QAL on my Redbird Quilt Co Facebook Page
or the group I host on Facebook -- Free Motion Quilting Frenzy.


Are you excited!

I know we are....

Please share with your friends!

Until next week.
Keep on Stitchin'

Hugs,
Karen

Follow me on Instagram too!!

Monday, January 7, 2019

2019 Free Motion Quilt Along: Lewe the Ewe

Greetings fellow quilters  --  Happy 2019! 

I hope you had a joyous Holiday Season.

I'm excited to share that I've teamed up with my long time Free Motion Quilting mentor and blogging friend Wendy Sheppard for a 2019 Free Motion Quilt Along.    
It's like a dream come true!  


You see I've stalked followed Wendy for years and years -- getting inspired by and learning from her quilting projects and tutorials -- taking her lead to purchase and use Aurifil thread -- being encouraged to quilt out of my comfort zone...  
Wendy says "put some McTavishing on it Karen"
 -- being tutored to shape up my feathers...    
Yes -- these needed a little help!
Karen Miller -- Feathered Flower Fun Design - 2015
I also helped Wendy promote her early quilting books (still some of my favorites). 

From: Recreating Antique Quilts
Karen's take on "Garden Lattice" by Wendy Sheppard  Recreating Antique Quilts
 And from the same book I made Wendy's Ivory Baltimore Pattern in wool !
Karen's take on "Ivory Baltimore" by Wendy Sheppard - Recreating Antique Quilts
Yes, Yes -- she's truly is an amazing designer, quilter, author, educator, and friend.  
I couldn't be more excited and honored to team up with Wendy for this fun Quilt Along.    
Karen & Wendy - International Quilt Market 2017
Aurifil USA's 10 Year Anniversary Celebration
Sooo you're wondering....
what are we up to?  

Well -- If you know ME
you know MY feelings on this.  

If you'd like to grow your Free Motion Quilting skills on ANY machine the best thing to do is practice, practice, practice.   

AND

I feel that practicing on a panel gives you a stress-free way of learning or improving your FMQ.


First, panels work in your favor -- giving you clues on what to quilt.
Also, the different sections of a panel allow you to practice more than one design.

IN ADDITION
When using a panel to be gifted to someone young -- you'll never have to worry about your quilting being judged.

Young folks are just happy to have something to call their own.

SO...
At All Costs...
Avoid learning to FMQ on a quilt top that you spent a year (or more) piecing!!

Grab a panel -- get it done -- if you're not sure who to gift it to, think about offering it to a local charity, hospice, or children's unit at the hospital. 
They'll LOVE and APPRECIATE it.    

With All This in Mind

Here are the details of the Quilt Along:

It's a Surprise !!

Wendy and I have
- agreed on a schedule
- targeted sections to quilt each week
--  BUT --
I have no idea HOW Wendy will quilt it
and
She has no idea HOW I will quilt it.

So, in a sense,
 it's a MYSTERY
Free Motion Quilt Along!  

Should be SO MUCH FUN!
Are you in ?

Let's talk Supplies, Schedule and Sponsors:

Supplies:

Here's What You'll Need

The Panel

We'll be using one of our favorite panels from World of Susybee, Lewe the Ewe.  
This panel is a 1 yard cut -- we won't add any extra borders or any piecing to it -- 
Who Has Time?
Product Code: SB20042-710.  
You'll need one panel - one 36" x 42" cut.


The Backing

For the backing Wendy and I both love the Lewe the Ewe in the Meadow.   
Product Code: SB20049-810  
For this fabric you'll need about 42" -- or 1.25 yards. 
My general rule of thumb is that the batting and backing should be a few inches larger than the quilt top -- It gives you something to hold when quilting your edge or border designs.


The Binding

For the binding we choose the Susybee Black and White Dot -- it's really an awesome multipurpose fabric.  
I often use it for small sashings too!! 
Product Code: SB20171-199    
A quarter yard of this fabric is perfect for your binding.


The Batting

  My go-to batting to add amazing loft to any project is Quilters Dream Wool batting.  
It really does "Quilt Like a Dream". 
There's minimal shrinkage and it can be machine washed and dried
 (albeit on cool temps) .  
You can read more about Dream Wool by clicking here.
A Crib size piece of batting is perfect for this project (60" x 46").


The Book !!  

Stitching Pathways by Wendy Sheppard

Most, if not all, of the motifs we plan to quilt 
are from Wendy's book,
Stitching Pathways.  
***
 In my opinion this is one of the best Free Motion Quilting books on the market. 
Not only does Wendy give you awesome beginner information and tips, she includes a wide variety of quilting motifs and shares -- in great detail -- HOW to quilt them.  

It's with this detail that you'll learn to stitch the motifs.   
Wendy and I will independently choose 
where to use the motifs, 
you'll learn how to stitch your choices from the book.  
You won't be disappointed -- I promise!  
Best Book Ever!

Thread ~ Thread ~ Thread

For my quilting I choose to use threads from my Aurifil Designer Collection, The Subtle Sampler.   If you're not familiar with The Subtle Sampler you can read more about it here ==>  The Subtle Sampler.


The Subtle Sampler contains 4 weights of Aurifil thread and I use all 4!  

 During the Quilt Along I'll explain why I choose one weight over another -- and why I choose the specific color I use.   I'll share as much insight on motif and thread selection as possible. 

Be sure to jump to Wendy's Blog to find out what she's Quilting with.  
I assume she'll be using her Subtle Strings collection by Aurifil.
Which will you choose?

Standard FMQ Supplies...

You'll want to consider having some of these basic FMQ Supplies:

Top Stitch Needles:  My favorite are Superior Titanium Coated Top Stitch Needles.  Because I use a variety of different weights of thread I choose to purchase the Assortment Pack of these needles.   We'll chat a bit about why I love these needles in the next post.   
NOTE:  If you're stitching on a Janome machine consider purchasing the Janome PURPLE Tip needles.  This needle is made specifically for Free Motion on the Janome.   I also keep the RED Tip  needles on hand.    Sometimes that Janome of mine gets a little temperamental.

Machingers Quilting Gloves -- To help you CONTROL your quilt top -- it's key to making awesome looking motifs!     Purchase them in the smallest size possible to comfortably fit your hand -- that way you can still change a needle, re-thread your machine, etc.  

Teflon Slider:  My favorite is the Supreme Slider.  It comes in several sizes.  I started with the standard size and eventually moved up to Queen.   This tool helps the fabric slide easily across your machine bed.   It's worth its weight in gold.

Machine Extension Table:  Ideally, having your machine drop into a table is the best solution -- this way your machine bed is flush with the table top that will hold your fabric while you're stitching.
If you can't do this, the next best solution is a machine extension table.   Your favorite shop can order these for you (I can too if you're not near a shop).   

Check out this blog post from years ago to understand options for machine setup.  I'll talk about this more next post too.

If you're interested in getting a Sew Steady extension table package there are some awesome package deals right now -- chat with your local shop owner or send me an email to learn more.  (redbirdquiltco@gmail.com).

More Information:  You can read more about the quilting area setup and supplies that I love by reading this POST from the 2016 Free Motion Quilt Along.    There are a few images, tips and a video to help you understand why I love the tools I love.  

Quilt Along Lessons:

Jan 7th
Karen's Announcement Post  ✅
Wendy's Announcement Post

Jan 21st
 Karen's Setup, Planning, Basting ✅
Wendy's Setup, Planning, Basting

Jan 28th
Karen's  Stabilization or Catch Up ✅
Wendy's  Stabilization or Catch Up 

Feb 4th
Karen's  Inside Center Panel ✅
Wendy's  Inside Center Panel

Feb 11th
Karen's Progress Pics ✅
Wendy's Random Thoughts 

Feb 25th
Karen's   Top and Bottom Rectangles ✅
Wendy's  Top and Bottom Rectangles

March 4th
Karen's  Top & Bottom Squares  ✅
Wendy's   Top & Bottom Squares  

March 11th
Karen's  Left & Right Panels  ✅
Wendy's Left & Right Panels 

March 18th
Karen's  Narrow Sashing Swirls ✅
Wendy's Narrow Sashing

April 1st
Karen's Fast Feather Border ✅
Wendy's Outside Border

April 8th
Karen's Binding, Sleeve & Label  ✅
Wendy's Binding, Sleeve and Label


Need to Purchase Supplies ?

We'd LOVE YOU to support YOUR favorite shop!!
 So please check with your local shop first, and if you're having trouble finding supplies jump over to this post for other options.

We'll be keeping a working list of shops that have at least 2 of the main items available (fabric, book, or thread collections) for purchase. 

Click "here" for participating shops.  
Check back often -- we're updating this list as we learn of new participating shops. 

Giveaway Items: 

NO QAL is Complete without Prizes!! 
We're working with a few awesome Sponsors to get you some fun prizes.

Click "here" to learn about our sponsors & available prizes.  
Be sure to visit regularly to see updates to the Prize Packages.  

Stay In Touch -- Follow Us!


To get some sneak peeks, learn about new posts on the blog or just see what's happening be sure to follow Redbird Quilt Co on Facebook and/or Instagram 

To save time you can also signup for blog email notifications.  
Scan my blog sidebar to sign up via Feedburner or Bloglovin'.
Each time I make a blog post you'll be notified via email.

Wendy Sheppard

Be sure to follow Wendy Sheppard on Instagram and/or her blog.

Support Our Main Sponsors:  


Follow World of Susybee on Facebook or Instagram - Signup for the "Buzzz"

Follow Aurifil on Facebook or Instagram - Signup for Auribuzz 


Joining in the FUN?

Aweseome!!

Please leave a comment below 
-- tell us where you are joining from.

Woohoo!  We're on our way!
So exciting to be here... 
 If you have questions drop me an email
leave me a comment below (but be sure to check back for an answer) 
or tag me in a Facebook or Instagram message.   
I'll get back to you as soon as possible.

Also -- be sure to share with all your Free Motion friends!  
The more of us the merrier. 
Have a blessed week all -- I'll tie in later.
Keep on Stitchin' 
Karen