Monday, April 8, 2019

2019 Free Motion QAL: Part 11 - Binding, Sleeve & Label

Greetings all!
We've managed to make it to the finishing stage of our
2019 Free Motion Quilt Along.
*
In today's post we would like to share some options for binding, hanging and labeling your finished quilt.
It's OK if you're still stitching,
we have a few weeks to wrap things up before the Giveaways!
*
We'll be updating the Giveaway Post with details -- stay tuned there.
*
For now though, plan to email or post a picture of your quilt by end of day Friday, April 26th to have  your name included in the random drawings.

We have fun prizes and we're looking forward to seeing your projects.

Many thanks for participating.

Now let's chat

Binding...


Some people LOVE it -- others DON'T!

I personally LOVE hand stitching... so attaching a binding to the front by machine and hand stitching the binding to the back makes me happy. 

Check out this 
Moda Bake Shop Basics Binding Tutorial
by Moda Designer extraordinaire Vanessa Goertzen of  Lella Boutique.


I had an opportunity to "play" with Vanessa, Rob Appell, Jenny Doan & a few other amazing designers at last years Missouri Star Birthday Bash...


It was an honor to represent Aurifil there.
You can watch the
 Missouri Star Sew-lebrity Sew-Off at the 10th Birthday Bash
video here.
It's a LONG ONE but so much fun.

NOT INTO HAND STITCHING ?
No Worries
 There are more binding options...

A few years ago I decided to find a way to bind completely by machine.

I was inspired to use a flange edge to allow for a framed accent.

After watching a few other tutorials I came up with my version:

Mitered and Flanged Machine Binding: 

You'll love this machine finished binding with step by step instructions for mitering the corners and finishing.

It includes an awesome accent flange and sweet top stitching with Aurifil 12Wt thread.

The mitered finish was inspired by a tutorial from: The Fat Quarter Shop and Lisa Bongean (see links in tutorial).

For the detailed tutorial click the image below:

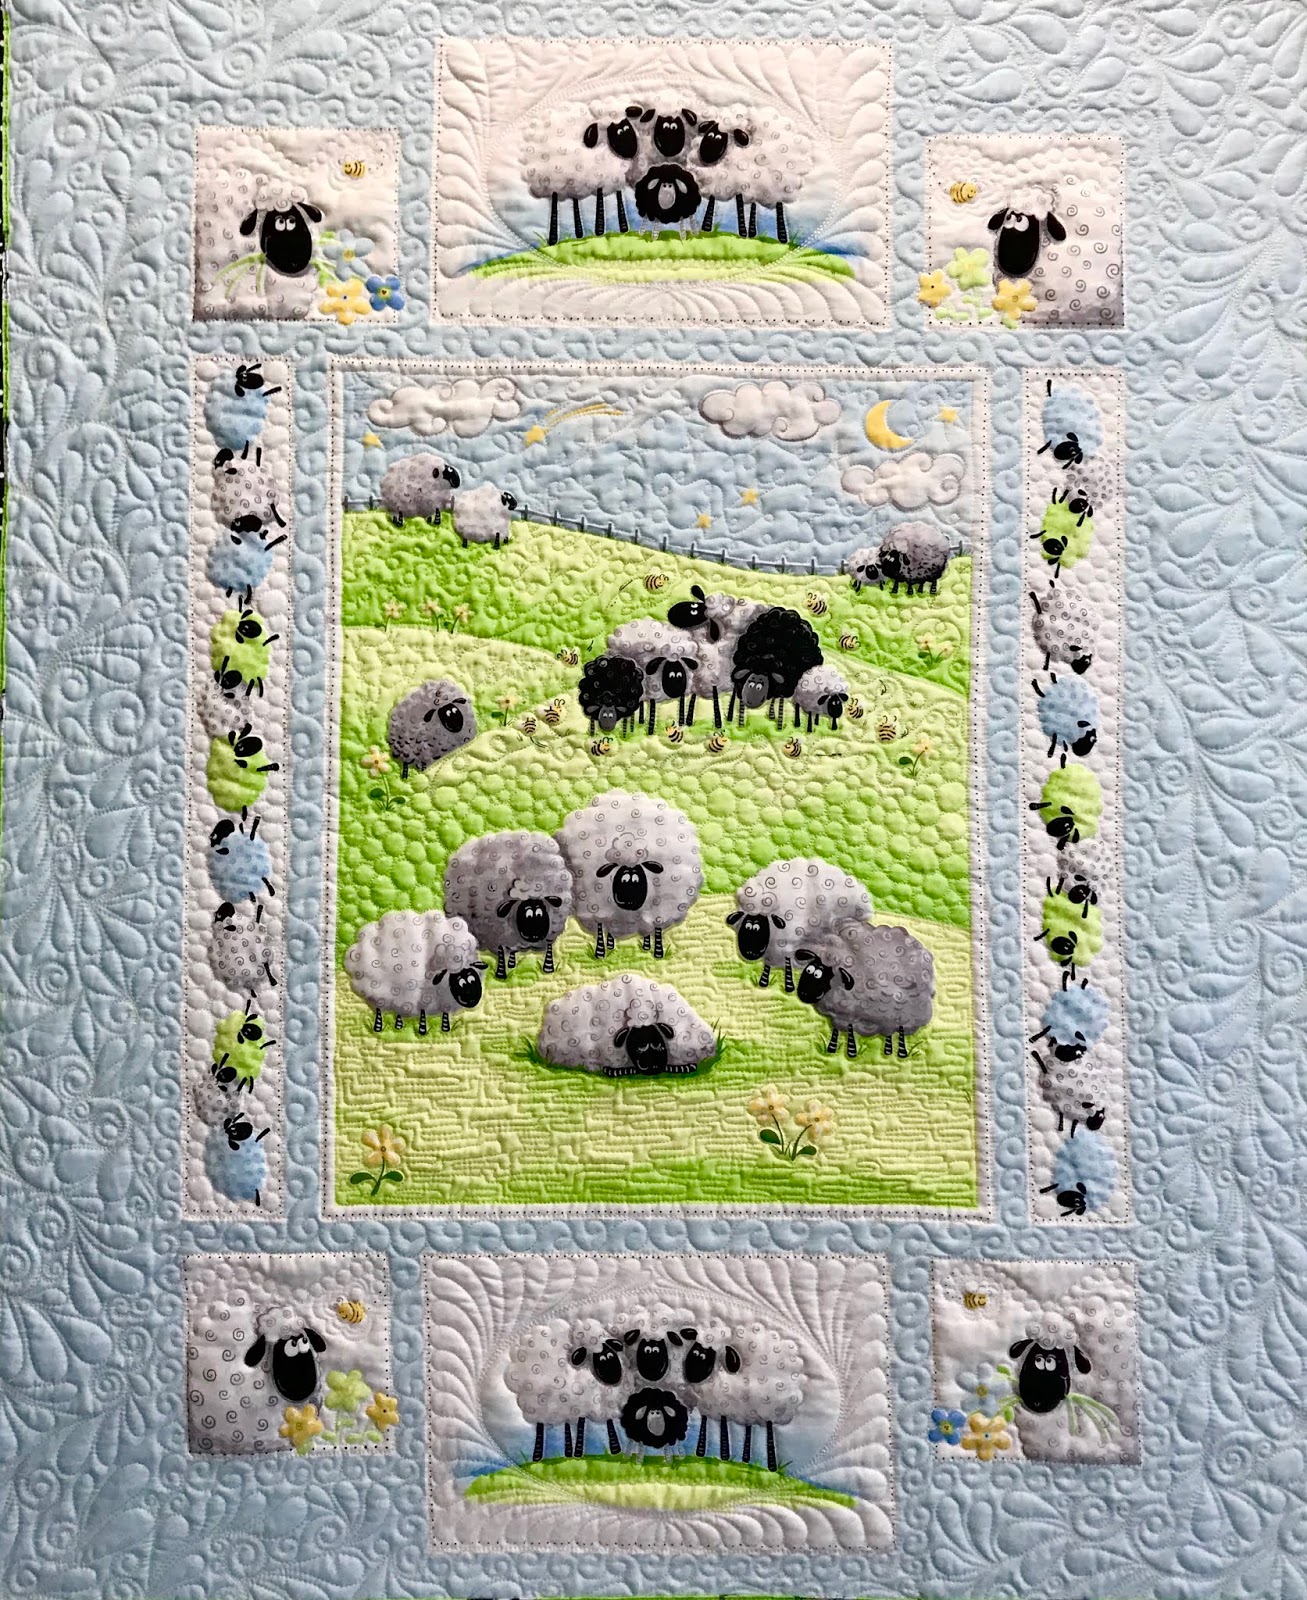
I used this tutorial on the Lewe panel.

If you don't have an Aurifil 12wt thread that complements your colors, try using a 28wt thread in its place.

It still looks beautiful!
Here's an image from the top:

 And another Close-Up:
 ...another corner:
 This is how it looks on the backside:
I used this method on my recent Lewe's Balloons quilt
except...
 I used Aurifil 28wt thread to top stitch.
And while we're talking Lewe's Balloons...
Let's chat about the hanging sleeve on this quilt:
It's not your typical solution for a sleeve. 
*
Instead of a full width sleeve I decided to do Prairie Points.

They are simple and fast!

There's a great online tutorial for this hanging method on 
Laura Coia's 
Sew Very Easy YouTube Channel.
Here's an image of the binding and the sleeve...
While we're at it let's talk label...
On this quilt I wrote directly on one of the prairie points for my label:
One quick and easy way to 
document the details of the quilt.
Be sure to use a permanent marker!!

Here's another version of the machine flange binding -- but instead of top stitching the finish I used a machine blanket stitch with Aurifil 40 or 50wt thread:

Mama Lal Quilt Blanket Stitch Binding:
 Can you see the tiny little blanket stitches ?
I used the same tutorial as above -- but skipped the top stitching.
It gives the edge a beautiful framed finish.

Here's the sleeve on the Mama Lal Quilt - 
Prairie Points x 4
(Using leftover pieces from the original panel ;) 
Love this method -- you stitch the prairie points right into your binding.
 Add a couple of tack stitches to the point and you have a method for hanging:
Again, using leftover blocks from the panel I added this label to the Mama Lal Quilt:
A Sharpie came in handy for this...
To attach the label I used Aurifil 12wt thread and big stitch quilted it to the back bottom right corner:
If you're not into hand writing your labels do check out this tutorial from a few years ago:

Computer Printed Quilt Label Tutorial:

Print fabric quilt labels from your home computer. 
Click the image to see the tutorial.


In all honestly -- I have yet to add a label or a sleeve to our Lewe Panel.
But I hope I shared enough ideas for you to make your own choices.

Which methods will you choose ?

Quilt Along Recap:

Jan 7:  Announcement Post  ✅
Jan 21:  Setup, Planning, Basting ✅
Jan 28:  Stabilization Quilting or Catch Up ✅
Feb 4:  Inside Center Panel ✅
Feb 11: Progress Pics ✅
Feb 25:  Top and Bottom Rectangles ✅
March 4: Top & Bottom Squares  ✅
March 11: Left & Right Panels  ✅
March 18: Narrow Sashing Swirls ✅
April 1: Fast Feather Border ✅
April 8: Binding, Sleeve & Label  ✅


That's a wrap...

I look forward to seeing your results.

Be sure to wrap things up by April 26th to be eligible for the Giveaway drawings.

More in that next week...

Have you visited our sponsors ?

Be sure to jump out to
Facebook or Instagram
and give them a "Like" or a Follow.
We wouldn't have great products or giveaways without our Sponsors! 

You can checkout the Giveaway Post
here ==> QAL Giveaway

If you have any questions, please leave them below -- I'll respond as soon as I can.

Happy Stitching!
Karen

*************

Learn more about how to use various thread weights in these Facebook Live Sessions
hosted by Aurifil at International Quilt Market: 

***
Follow me on social media:
Redbird Quilt Co. on FacebookInstagramPinterestTwitterYouTube
Join my FMQ Frenzy Community Group on Facebook.
See my other Moda Bake Shop Recipes
Click here to see my upcoming events.
*
***  Guilds, Groups and Shops ***

I'm booking Lectures, Trunk Shows and Workshops
for 2020 and beyond!

If your Shop, Group or Guild is looking for programs or workshops I would love to hear from you.


Free Motion Quilting on Home Machines
Basics ~ A Quilters Doodles ~ McTavishing
A Full Day of Feathers
*
Aurifilosophy
*
Wool & Needle turn Applique
Technique or Project Oriented Workshops available.

Click here to see my upcoming events.
*
Send email inquiries to karen at redbirdquiltco dot com
or redbirdquiltco at gmail dot com


Note:  The FTC requires that I tell you.... I occasionally use affiliate links on my blog and website.  I may be compensated for purchases made using the links.  Rest assured I will only share sales and promotions for products I know and love myself.  Many thanks for your support of my very small business.

Monday, April 1, 2019

2019 FMQ Along - Part 10: Fast Feather Border

Greetings all -
Happy April Fool's Day!
*
Be careful out there...
You never know what Fool may come your way.
*
Welcome to Part 10, 
the final FMQ portion of our  
2019 Free Motion Quilt Along.
This week we're stitching the outside border.

I'm excited for you that 
we're nearly complete 
but I'm also a bit sad that our time together is winding down.

Wendy and I were texting this morning -- giving thanks for the opportunity to collaborate on the QAL and keep in touch weekly (rather than bi-annually at Market !).
*
Who knows what other "projects" we might find to continue to keep in touch ;)

We hope you've enjoyed your time here too!

To recap...
We started with a 1 yard cut of fabric:
Lewe the Ewe panel by World of Susybee...
We added this awesome book by Wendy Sheppard,
Stitching Pathways.
We each chose our favorite Aurifil threads
and some batting....

I sandwiched with one layer of Quilters Dream Wool -
  It really does "Quilt Like a Dream". 
There's minimal shrinkage and it can be machine washed and dried
 (albeit on cool temps) .  
You can read more about Dream Wool by clicking here.


and we've spent a few weeks sharing how we would each quilt this beautiful panel.

I've stitched Reflections and Pebbles
and Loops and Swirls
and a variety of other fun quilting motif.
Hopefully you've learned a LOT!
*
Let's move forward to the 
specifics for this week
and stitch a new feather variation...
*
Feathers, 
feathers, 
 feathers...
I Love Feathers!

Any Shape
Simply Spring Fleur - Janome Home Machine w/ Aurifil Thread
Any Medium
My Sketchbook Doodles
Stitched on... Any Machine
Innova Longarm Free Motion with Aurifil 28wt
 I just LOVE Feathers!

If you're like me, you've gone page by glorious page through Stitching Pathways.
Feather details begin on Page 54 and continue through Page 66 !  
Now, that's a Feathered Frenzy...!!

Wendy's instruction and detail couldn't be more helpful for learning to FMQ Feathers.
Give those pages a run - through.
See what catches your eye.
Try some out, you can't go wrong!

 With the remaining border being varying widths and lengths I thought it appropriate to choose a design that was flexible -- that could shrink or grow as necessary.

So I stitched a variation of Wendy's
Pseudo Feathers found on Page 66
in Stitching Pathways.
I refer to my version as
Fast Feathers.

They are called this because, like Wendy's Pseudo Feathers, there is space between each feather plume.

Generally I'll draw/stitch a fiddle head (fern)
 and "grow" feather plumes from the "spine" of the fiddle head.

Else, you could draw/stitch a swirl and grow the feather plums from it.

Fast Feathers are generally unplanned and unmarked, although I will at times sketch in a simple spine so I have a clue as to where to fill with plumes.

Here's a practice sketch of fast feathers:
Have I mentioned that I like to practice on paper and fabric before I begin stitching the real project.
 
Practicing either way is a great opportunity to get warmed-up and to build muscle memory for that design.

At International Quilt Market last year many Aurifil Designers shared their skills and expertise with  Facebook Live feeds from the Aurifil booth. 

You can get a glimpse of me stitching out Bumpback and Fast Feathers in this video
recorded live!
(Best when viewed from a computer - not a mobile device).

Another Fast Fun Fact!
Did you know that Wendy and I are both Aurifilosophers ?
We're 2 of a group of 21 certified educators for Aurifil thread.
You can see our funny video clip here
and read about Aurifilosophy here.

But I digress...

Let's get some feathers stitched out...

Here's a few clips of my progress.
You can see where practicing a swirl and a plume would come in handy...
For consistency I used Aurifil 40wt thread color #2024 again.
I added in a few "extra" swirly plumes as necessary and traveled to make a new swirl or fiddle head as I needed to move along the border.
I love how the inside border swirls and the new fast feathers complement one another.
As you travel creating the design try to mix-up the direction of your plumes -- so they are not all going to the same direction.
It's pretty easy to turn a corner -- backtrack if necessary!
It's all starting to come together now...
Love, love, love the texure!
Pay no attention to the fact that I didn't take pictures until after the binding was on!
Ooops...
We'll talk binding, hanging and labels next week!
...and there you have it!

A few fast feathers around a swirl or fiddle head for the win!
Be sure to watch the video I shared above -- it always help to watch and learn.

And also be sure to jump over to Wendy's Blog to see what amazing stitching she is sharing this week.

Next week we're back to discuss binding, hanging and labels.

Then we'll take a week for ya'll to finish up before submitting your entries for the Sponsored Giveaways!

Have you visited our sponsors ?

Be sure to jump out to
Facebook or Instagram
and give them a "Like" or a Follow.
We wouldn't have great products or giveaways without our Sponsors! 

You can checkout the Giveaway Post
here ==> QAL Giveaway

If you have any questions, please leave them below -- I'll respond as soon as I can.

Happy Stitching!
Karen

*************

Learn more about how to use various thread weights in these Facebook Live Sessions
hosted by Aurifil at International Quilt Market: 

***
Follow me on social media:
Redbird Quilt Co. on FacebookInstagramPinterestTwitterYouTube
Join my FMQ Frenzy Community Group on Facebook.
See my other Moda Bake Shop Recipes
Click here to see my upcoming events.
*
***  Guilds, Groups and Shops ***

I'm booking Lectures, Trunk Shows and Workshops
for 2020 and beyond!

If your Shop, Group or Guild is looking for programs or workshops I would love to hear from you.


Free Motion Quilting on Home Machines
Basics ~ A Quilters Doodles ~ McTavishing
A Full Day of Feathers
*
Aurifilosophy
*
Wool & Needle turn Applique
Technique or Project Oriented Workshops available.

Click here to see my upcoming events.
*
Send email inquiries to karen at redbirdquiltco dot com
or redbirdquiltco at gmail dot com


Note:  The FTC requires that I tell you.... I occasionally use affiliate links on my blog and website.  I may be compensated for purchases made using the links.  Rest assured I will only share sales and promotions for products I know and love myself.  Many thanks for your support of my very small business.