Showing posts with label growth chart. Show all posts

Saturday, January 23, 2016

2016 Free Motion Quilt Along - Part I Pieced Borders

Hello fellow quilters and welcome to the first Redbird Quilt Co. Free Motion
Quilt Along!
I'm so excited that you're joining in the fun -- thanks for your patience and honest feedback while I work my way through this new adventure! 

If you missed the Introductory Post for the Free Motion Quilt Along -- click here to review it. It's never too late to join

If you missed the Supplies Post -- click here.

To learn more about our awesome sponsors (Aurifil, Quilter's Dream Batting, World of Susybee, Creekside Fabrics, Quilts and Yarns, Sew It Is Quilt Shop & Quilty Pleasures Quilt Shop) and the fantastic products they've provided for the Quilt Along Giveaways click here.

FMQAL Part I:  Pieced Borders

We're going to run right though getting the simple borders on this unit so we can move along to basting and quilting next week -- So let's do this!

For Part I of the Free Motion Quilt Along (FMQAL) we're going to add the pieced borders to the whimsical Susybee Lewe's Balloons Growth Chart.
Get those fabrics ready!!

As outlined in detail on the Supplies page, for piecing you'll need:

*  1 Lewe's Balloons Growth Chart Panel
*  1/2 yard of Black Dot fabric for Border 1 (& Binding)
*  1/4 yard of Yellow fabric for Border 2
*  1/2 yard of Green fabric for Border 3
    Also on the Supplies page I've recommended several different colors of Aurifil 50Wt thread.

    Choose your favorite neutral Aurifil 50Wt color for piecing. #2105, 2600, 2024
    I encourage you to try 50Wt Aurifil thread during the FMQAL for piecing AND quilting!

    This fine, yet strong, 100% Egyptian Cotton thread keeps seam bulk minimized - it helps with accurate piecing by not adding bulk with thread.

    Below are some of the colors that go wonderfully with Lewe's Balloons...
    If you're planning to use Aurifil thread for your quilting and you haven't picked it up yet and/or can't find it at your local quilt shop -- Checkout the current sale at the Bear Creek Quilting Company.
    Aurifil thread is currently 25% off!
    That's a great deal.
    Last I looked they had all the colors I outlined above.
    On sale now through 1/31/16  Click here!

    Prepping the fabric - some notes...

    I do not pre-wash my fabrics.
    If you decide to pre-wash yours be mindful that your quilt measurements may differ from what is specified. 

    Also, I love to press with steam!
    Others prefer to use a dry iron.
    Either way, when pressing, try to avoid stretching or distorting the fabric.
    Before cutting WOF (Width of Fabric) strips I normally leave the fabric folded in half and press through both layers (on both sides).  Then I open up the fold and press it flat.

    Additionally, I didn't starch these fabrics.  Starching has become a very popular method to stabilize fabric for cutting and piecing -- but for our simple borders we can scoot-by without.   

    Lastly, all seams were finished with a scant 1/4" seam allowance.
    You can use this method to test your seam allowance.

    Now lets get cutting!

    The Free Lewe's Balloons Growth Chart with Borders Pattern Page 2 specifies the exact cuts necessary for your border fabrics:
    Download and print Page 2 by clicking here.

    I included the cutting requirements (highlighted) in 2 images (below):

    We'll begin with the Lewe's Balloons Growth Chart panel.
    Press it well -- anticipating you'll trim it to 17.75" wide by 42"long.

    When working with panels it's sometimes a challenge to square them up.  If you feel your panel is twisted or NOT square you could consider using starch and steam iron to "persuade" it into shape.
    NOTE: All subsequent cuts are dependent on the panel being trimmed to 17.75" x 42".
     If your panel is a different size, adjust accordingly.

    Cutting requirements highlighted and enlarged:


    How to read the format used above:
    Border 1: Black Dot - Cut (3) 1" x WOF
    means
    For Border 1 you will cut 3 strips that are 1" wide by the Width of the Fabric.

    The Width of Fabric is the distance between the fabric selvages.

    I assume a 42" usable strip after trimming selvages.

    Continuing... following the directions above, cut the Growth Chart and WOF strips for Borders 1, 2 and 3.
    Once the WOF strips for the borders are cut you will piece and/or sub-cut to achieve desired lengths for left/right and top/bottom strips as specified below:

    NOTE:  Border 2-C may need to be pieced to achieve a 43" length
    Border 3-E will need to be pieced to achieve the 45.5" length.
    All other pieces will be sub-cut to achieve the desired length.

    When I am piecing non-binding strips together, I use a straight seam (not mitered).

    Need help cutting long strips?
    See my tip for cutting long strips on the Family Tree Quilted Envelope Pillow tutorial I created for the Moda Bake Shop ==>  Family Tree Pillow   Scroll a few pages into the tutorial to find the Cutting Tip.

    Soooo.... once you have all the pieced or sub-cut lengths prepared you can begin to attach them to the growth chart panel.

    The quilt construction diagram on Page 2 of the free Pattern is labelled alphabetically indicating which strips should be pieced first, second, etc.
    Free Pattern Page 2 - Construction Diagram
    When I piece long strips I like to use this method:

    1. Fold The growth chart in half lengthwise and finger press to mark the center spot with a crease.  (Just along the left/right and top/bottom edges).
    2. Now fold the border strip the same, in half and finger press a crease at the center.
    3. Now align the center marks (creases) right sides together and pin at the crease.
    4. Next, ease and pin the remaining border fabric to the chart.
    If your measurements are correct this should lay flat

    Stitch with a complementary thread using a scant 1/4" seam allowance.

    Continuing... referencing the Page 2 construction diagram (above)

    Begin with:
     Border 1 "A" strips -- attach both.
    After attaching both, 
    Press once to set the seam, and
    press seams toward the outside.

    Attach Border 1 "B" strips.
    Repeat the process through Border 2 and 3 as specified.

    Eventually you'll have a quilt top ready to be paired with batting and backing!
    Woohoo!
    The Big Picture!
    At this stage I normally choose my thread and backing for the project by laying the thread on the quilt top and unwinding a few lengths.

    What's next ?

    You'll have about a week to get the borders pieced on the Lewe's Balloons Growth Chart at which time we'll be layering, pin basting and discussing "How To Quilt That".

    In preparation for the next steps I'll share a post about my favorite quilty tools -- but if you want a sneak peak of the tools I LOVE to quilt with visit this post ==> Do You FMQ? The Process

    Don't Forget The Batting

      For this project I recommend using Quilter's Dream ~ Dream Wool batting.

    Dream Wool is 100% wool made with scoured and super washed domestic and fine merino wool.

    It adds beautiful texture to your quilting, is washable without shrinkage and truly does "Quilt like a Dream".

    I hope you get a chance to try it out.  You can find it at your local quilt shop in pre-cut sizes or off the roll.  You'll be amazed at the tension issues that are helped with a higher loft batting.

    Thread, Thread, Thread

     -- as I mentioned above, you'll want a variety of fine weight threads for quilting.
    I share with you what I've been successful with -- and I adore using Aurifil brand 100% cotton thread.  If you missed it above:

    If you're planning to use Aurifil thread for your quilting and you can't find it at your Local Quilt Shop -- Checkout this sale at the Bear Creek Quilting Company.
    Aurifil thread is currently 25% off!
    That's a great deal.
    Last I looked they had all the colors I recommended for the QAL.
    On sale now through 1/31/16  Click here!

    We're off and running -- now be sure to leave your questions here on the blog and check back here for my responses.  Sometime I cannot reply via email as blogger does not track addresses for everyone.

    Yippee -- I can't wait to Quilt with You!
    Have a blessed weekend - stay warm (or cool).
    Karen

    Wednesday, June 4, 2014

    Do you FMQ? The Process...

    It's been many, many weeks since I've had my hand at moving fabric around under a needle - I needed the practice, I needed the down time, I just needed to do it!  

    This is a sweet little Piggy Growth Chart by The Wonderful World of Susybee and it's a fun way to get those FMQ juices flowing again.   I dove into my stash of beautiful #Aurifil Mako Cotton 50Wt threads and had some fun!!
    Here are the steps that worked for me:

    1.  Give your machine a good cleaning inside and out.  The Janome Horizon doesn't need to be oiled, so a good dusting did the trick.  I removed the face plate, swept all around, and discarded those dust bunnies!  It's extremely important to start with a clean machine.

    2.  Outfit the machine with a Little Genie Magic Bobbin washer -- (see it below in the bobbin area ?)  These little guys are the best.  They take up that little extra space in your bobbin area and help your bobbin thread glide smoothly - especially during Free Motion Quilting zigs and zags.  One washer lasts years so they are well worth the investment (12 per package).  I've never done without one and purchased them originally on recommendation from Leah Day.   Give them a try!  Share with your friends!

    3. Start with a full-up bobbin loaded with Aurifil Mako Cotton 50Wt thread.  YOU KNOW I love this thread! The 50Wt thread is thin and goes a long way to make your bobbin last and last...  I use the same thread in the top and bobbin and it works out wonderfully.  
    4.  Thread, thread, thread -- was fun to open and use a brand new, full spool of Aurifil thread on the machine.  This is Mako Cotton 50 Wt in Color #2423.  Just right for the piggy and the border...
    5. Feed Dogs -- to Drop or Not to Drop:
    Oh NO!  Now all my secrets are out... this is a sweet little workaround to avoid dropping the feed dogs and setting the thread length to zero.

    On the Horizon I find that the machine makes more consistent stitches when I leave the feed dogs UP and the thread length at 2.5.    (Yet another tip from the wonderfully skilled Leah Day).

    I tape this little helper down so that my feed dogs don't damage the underside of the Supreme Slider...  PS - I do NOT engage my single hole throat plate on the Horizon as I have a small burr on the underside and it snags and breaks my thread -- I really should have that checked out ;)

    NOTE:  I've replace my cardboard feed dog cover with one made from template plastic.  The template plastic holds up better to the feed dog movement and puts less "dust" into the casing area.
    6. Insert a new needle --  This time I was running with a  Microtex 80/12 needle.  The Microtex Sharps are fantastic too! Aurifil recommends you use Microtex 80/12 with 50Wt thread - (I didn't realize that).  You can see their recommendations for Mako Cotton 50Wt by clicking here.

    Note: My Janome Horizon 7700 REALLY likes it when I use Janome brand needles.  Superior Brand Sewing Needles are awesome too!.  If you're skipping stitches chances are your needle need to be changed and/or "right sized" or your foot needs to rest closer to the fabric.

    7. Supreme Slider & Gloves:  I washed the linty back-side of my Queen Supreme Slider (so it will stick well) and gathered my Machiners X-small gloves.  The slider is a Teflon like sheet that allows your quilt to move smoothly over the machine bed.  There are other less expensive models available as well but I've not yet tried them.   The Gloves are prefect to Grip your quilt layers while manipulating for quilting.  The Machingers gloves run large -- so the X-small was well large enough for my hands.

    8. Quilting Foot:  Choose and attach your favorite FMQ foot. I normally work with my open foot --if I could only find it (Where did it go ??)

    Note: When I quilt around applique I almost always use a CLOSED foot.  The Open Toe Feet may catch on wool or needle turn applique pieces, especially if you're using a higher loft batting. Personally I also prefer to use a foot that is ROUND.  Some feet are square or oblong and personally I find this distracting, especially when I am echo quilting.

    9. Needle down position:  Before you start stitching -- engage the "needle down" option if your machine has it.  This way, whenever you stop sewing your needle will stop in the "Down" position.   This allows you to reposition your hands without the quilt top moving.
    10.  Top thread tension:   Last but not least, up the top thread tension -- this is a MUST DO for me on the Janome with Cotton fabric, Aurifil Thread, and one or two layers of batting (cotton/wool).  Works like a charm every time.  

    Note: Each machine and quilting style will vary.
    Woohoo!  We're ready to stitch !!

    Note:  This quilt was prepared with one layer of warm and natural batting.  An additional layer of Wool or Silk batting would give much more texture to the quilting.

    First I wanted to outline all the pigs, then follow their inside features as well, eyes, noses, etc.

    On this sweet little growth chart my customer sister told me not to fuss... so I took a few shortcuts.

    To start, bring the bobbin thread to the top, take a couple stitches in place and trim threads (do not do this on a show or juried quilt).
    Proceed around the piggy , highlighting the piggy features as best you can. 
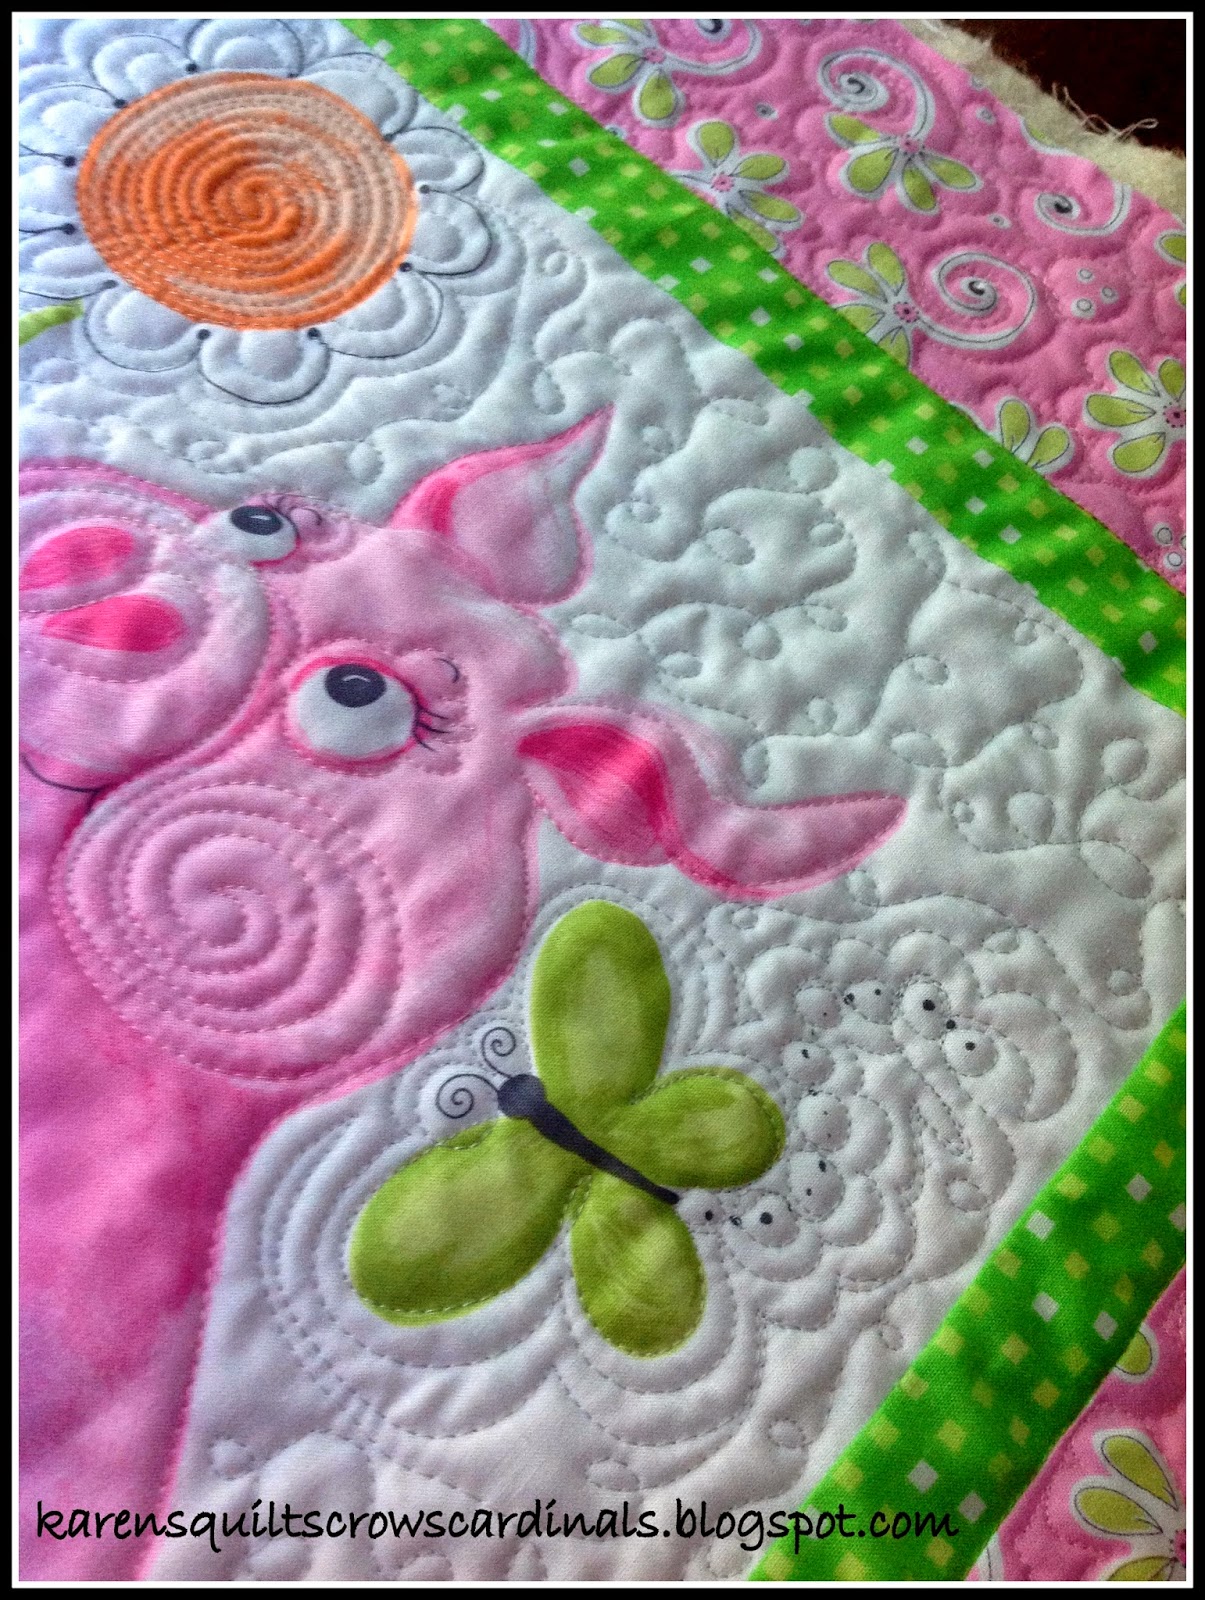
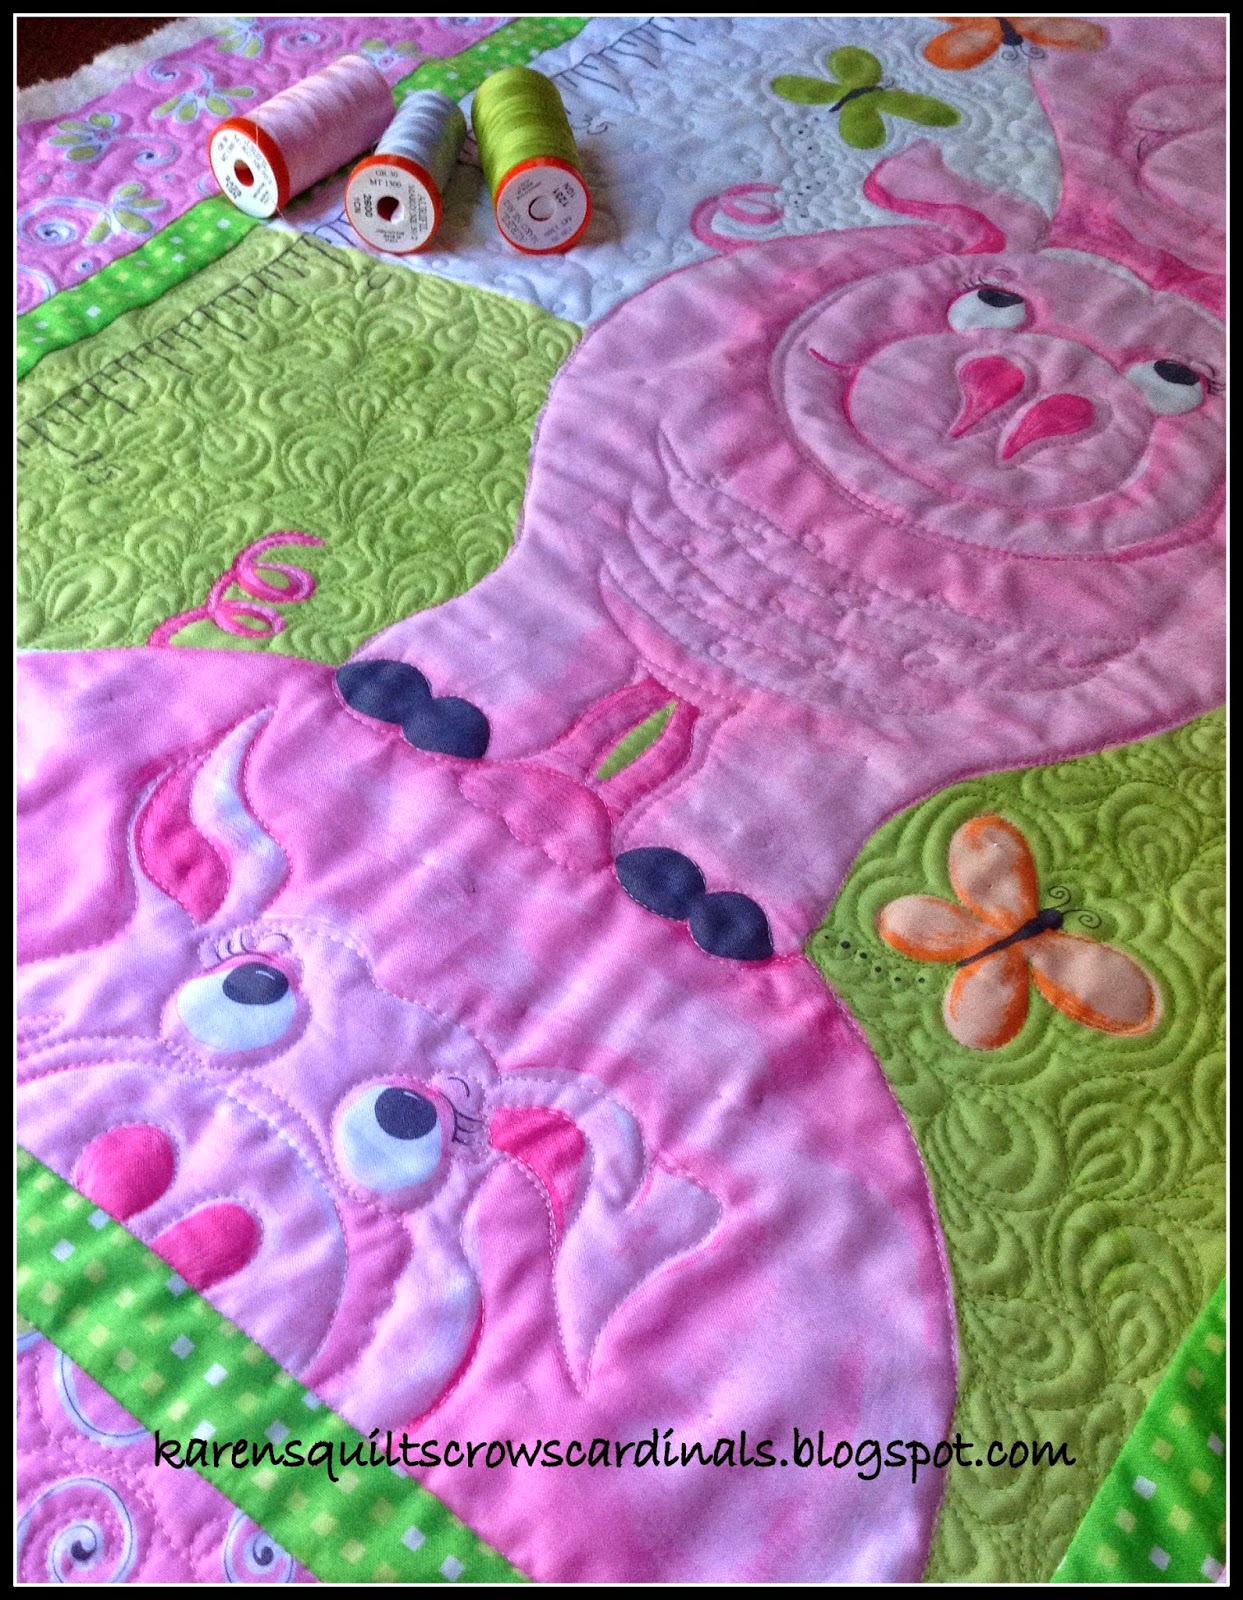
    This top piggy was fun to stitch -- the rounded features of his face and belly screamed spiral!!  I was a little wonky starting out but he's still sweet!!
    After outlining the piggies and filling in their features, decide on a background filler (and color).

    Use the filler to travel from background component to background component.

    I chose to use a quick "loop de loop" and it worked out great.

    The Aurifil Mako Cotton 50Wt in Color 2600 gave the background a bit of sparkle...  Sweet!
    While traveling with the background loop de loop I would find myself inching up on a background component (butterfly, bee, etc).

    When close enough stitch in the ditch around the item -- then make a few echo stitches to complete the shape.  I love the way stitching the pebbles gives the butterfly movement...
    The flower component was fun to quilt!  Start on the perimeter and work your way to the middle with a swirl -- then split the width of the quilting on your way back out.  Be sure to outline the inside and outside of the petals - and echo stitching always makes things look more defined.
    The green background spoke of leaves and grass to me -- so I decided to incorporate an Angela Walters design -- I love the way it turned out.
    Oh, and that Aurifil Mako Cotton 50 Wt in Color #1231 matched the greenery perfectly!!

    I had a tough time deciding what to stitch in the outer border -- so again I let the fabric talk to me and did an outline stitch around the flowers and swirls and pebbles... I think it came out just fine.  Do you like it ?
    Here is the status as I head to bed -- I think I need to do something with the green border but my customer sister is telling me not to fuss.  
    We'll see what tomorrow brings ;)

    You can see other Susybee Growth charts I've quilted here, here and here.

    ***
    There are more Free Tutorials and Patterns on my blog - just click here -- or visit the My Tutorials tab at the top of this page (or, on a mobile device drop down the line options).

    I also share Free Motion Quilting on a Domestic machine on my YouTube Channel -- Click here!

    I would love to hear your feedback - Thanks for stopping by!

    *****

    For a more in depth Free Motion Quilting tutorial -- please visit the "Free Motion Quilting Fun" post where I share insight to different weight threads and quilting motif.  This main tutorial is hosted by the Bear Creek Quilting Company but you can click here for my introductory post. 

    *****

    Linking up to a few of my favorite parties -- check them out on the sidebar and click on over to view the eye candy.

    Hugs,
    Karen

    Friday, May 9, 2014

    Favorite Things Friday - Fabric, Thread and Flowers...

    It's a simply gorgeous day in the Finger Lakes today.  
    Welcome!... and thanks for stopping by.

    The Sun is Shining and the Air is Warm... nothing but goodness in our part of the world.
    I was up early this morning contemplating how to quilt this beautiful pink piggy growth chart.  My sister Janet put this together for little Abby - a close friend of our family.  Isn't it darling?  
    Panels are one of my "favorite" things to Free Motion Quilt.  They allow you to practice lots of fun fillers --  swirls, pebbles, waves, loop de-loops -- these will all find their way into this cute Pig Growth Chart by Susybee.

    See other growth charts I've quilted here:
    Another "favorite" of mine is picking the right threads for the job.  

    If I want dense quilting, I always turn to #Aurifil Mako Cotton 50 wt Thread.   It allows me to quilt heavily without nasty buildup -- and it never breaks or fusses.   

    I use the same thread in the top and bobbin and breeze through the quilting.
    The color thread you choose can have an amazing effect on the results. 
    In this case, I don't have the exact color moss that I need, but the thread I chose -- #2840 Loden Green -- will highlight the butterfly with a bit of sheen.

    For the background quilting, I decided on #Aurifil Mako Cotton 50Wt #2600 -- Dove -- this will add "just a hint" of metallic to the background fillers and give them a little sparkle!
    For the piggy -- I've chosen Aurifil #2452 --Dusty Rose -- (I go through a lot of this color ;)  The thread will be just a little bit darker than the piggy making the quilting become an accent to the fabric. 

    Tip:
    When you are testing thread colors, always unwind them and lay them directly on the fabric -- it gives you a better idea of how they will look once quilted.
    Stay tuned - I hope to quilt this little guy in the next week or so.... I'll be sure to post pictures!

    For now I'll leave you with some pretty shots of the Bradford Pear tree in our side yard.  Each year it blooms profusely (no fruit - just beautiful blooms).   This year I found great pleasure in just looking at it...
    -- and looking closer.  

    My goodness it is a work of art.
    Where is my wool and thread ?
    This one needs to be stitched....
    For those of you preparing for market -- safe travels!   The rest of us will be waiting patiently for pictures!

    If you're hanging around next week -- be sure to check out The Bloggers Quilt Festival over at Amy's Creative Side!   It's the biggest online quilt show around and YOU are invited!!
    Click the image below to learn more.
    You can see my entries from last fall here and here.

    AmysCreativeSide.com

    Happy Weekend all -- take care and thanks again for stopping by.

    Linking up to Leah's Free Motion Friday!  A wonderful resource for a FMQ!

    Hugs,
    Karen