Showing posts with label Pat Sloan. Show all posts

Monday, December 5, 2016

Winners and More Winter Bliss Details

Many thanks to all that participated in the first ever Redbird Quilt Co Buy 2 Get 1 Free Sale and Thank You for your continued support and encouragement.    
*
I'm excited to announce 3 winners (Blog, Instagram and Facebook) of the Really Mini Redbird and Berries Wool Quilt Kits
*
....Before I share the quilt kit winners I thought I'd share a few "process" pics and information about my recent "Winter Bliss" finish.   
My Version of Winter Bliss -- Original Design by Pat Sloan
Winter Bliss is a pattern by Pat Sloan and can be found in Pat's latest book
"Teach Me To Machine Quilt"
*
a comprehensive and wonderfully detailed book focused on making new quilters comfortable with the process of quilting through 3 layers of fabric.
*
You can read my
Book Tour Review in this post.
and 40 other Book Tour posts using this index page.
*
Winter Bliss finishes appx 25" x 28" and is a wonderful addition to any winter decor.
Created with Blackbird Designs Autumn Lily cotton fabric (for Moda) on the borders and
Primitive Gatherings Muslin Flannel for the background.

I used wool from my stash including Primitive Gatherings wool and a variety of others I've collected over the years.
*
I followed Pat's pattern to prepare the quilt top after hand stitching the snowman to the background fabric.
Also following the pattern, I cut all of the applique pieces from wool and hand stitched them to the quilt background using my favorite Aurifil 12Wt thread
On the snowman and the holly leaves I used a blanket stitch.
*
On the berries, birds, poinsettia leaves and stems I used an overhand or whip stitch.
This stitch moves along much faster than a blanket stitch and still looks beautiful.
I added a few fancy stitches to top off the poinsettia center -- that was fun!
Once the applique was stitched down I layered the quilt top with Quilters Dream - Dream Orient batting and pin basted.
*
Again following Pat's amazingly detailed and thorough book, I put a new needed in my Janome 7700 and got busy quilting.
You can see my quilting setup in this post.
*
I stitched around the wool applique with my trusty FMQ Echo Foot and using Aurifil 40Wt thread in the top and 50 wt in the bobbin.
This foot is so handy when stitching around wool.  
Because the foot is slightly curved it gently rides up over the edge of the wool applique, allowing you to stitch just outside of the edge. 
An open toed foot would catch on the stitches and other rounded feet would keep you from getting close to the applique.
*
This foot is perfect.
*
Once I outlined all the applique (per Pat's suggestion in Teach Me To Machine Quilt) I decided to top stitch border 1 using Aurifil 12 Wt thread and a walking foot. 
*
I always love how that looks:
Now back to quilting... time to get the background and the snowman quilted:
 I used Aurifil 40Wt thread for most of the quilting.  It gives such beautiful texture.
Around the outside border I quilted a simple teardrop / paisley with loops.
The fabric is too busy to see much of the quilting.
When you're quilting busy fabrics though, take the opportunity to be creative with your practice as mistakes will go unseen ;)
*
When I got to the corner blocks I tried out Free Motion Straight Line quilting per Pat's Book.
Simple, fun, effective...
*
Done quilting, I squared up the quilt top, cut a 2" binding on the bias and attached it to the quilt top with my favorite mitered finish tutorial by Lisa Bongean for the Fat Quarter Shop.
Thank you Lisa and Kimberly.
You can see my mitered, flanged, machine binding variation of this tutorial here.
*
Quilt Top Complete...
Sew much fun!
I hope you enjoyed learning a little more about the Winter Bliss prep and quilting.  It's a fun project that can be displayed for months during the winter.  I would love to see any project you create from Pat's new book -- Teach Me to Machine Quilt.
*
And now for the winners of the
Really Mini Redbird and Berries Wool Kits
complete with Background Grunge Fabric, Wool Pieces, Aurifil 12Wt thread and Layout Diagram
*
On Facebook the Winner is:

On Instagram the Winner is:


And on the Blog the Winner is:
 Congratulations everyone -- if you've not already sent me your addresses please do --- I can't wait to get your kits in the mail.

Many thanks again to all that participated in the Sale and Giveaway.

Happy Quilting!!

I'm booking Redbird Quilt Co. Lectures, Trunk Shows and Workshops for 2017 & 2018
If your Shop, Group or Guild is looking for programs or workshops I would love to hear from you.
Domestic Machine Quilting,  Wool & Needle turn Applique - Technique or Project oriented workshops are available.

Send email inquiries to karen at redbirdquiltco dot com
or redbirdquiltco at gmail dot com
*

Have a blessed week all and many thanks for your continued support!
YOU Make my World a Happy Place!
*
Follow me on social media:
Redbird Quilt Co. on FacebookInstagramPinterestTwitterYouTube
Facebook my FMQ Frenzy Community Group


Note:  The FTC requires that I tell you.... I occasionally use affiliate links on my blog and website.  I may be compensated for purchases made using the links.  Rest assured I will only share sales and promotions for products I know and love myself.  Many thanks for your support of my very small business.

Wednesday, November 30, 2016

Pat Sloan's Book Tour and Giveaway!

 Welcome fellow quilters!!

You've landed in upstate New York, USA
for one of the many stops along
A book tour you say ?
YES !!  
*
Pat Sloan has done it again with a new book in her "Teach Me" series -- this one is focused on one of my favorite topics,
Machine Quilting.    
Did you know:
Pat has published 33 books in 16 years?
*
Holy WOW -- See some of them here.
*
For this book,
Pat invited 41 of her Quilty friends
including !! ME !!
to participate in the tour.
*
If you haven't been following along, be sure to hop on over to this post and get busy!
There are projects, giveaways, tips, tricks and fun all along the way.
*

Some History

I had the opportunity to meet Pat at International Quilt Market oh... ? 2 years ago.  She was hanging out in her Moda Fabrics booth -- surrounded by her amazing new fabric line and beautiful inspiring quilts and flashing her fabulous smile.

It was my first trip to Market and I was already in awe of the entire event -- but getting to meet "THE" Pat Sloan was certainly a highlight!

We had all of about 2 minutes to chat before she was whisked away to another crew of anxious followers.  

About a year later Pat invited me to be a guest on her American Patchwork and Quilting Podcast.

Talk about completely and utterly honored.

You can read my take on it here and listen to the podcast by clicking the image below.
Fast forward about 5 months when I learned that Pat was publishing a book on Machine Quilting.!!

Oh Boy!!
I sent Pat a note to congratulate her and tell her how anxious I was to peruse and learn from her new book.  
What Machine Quilter wouldn't be?

  So I was completely honored that Pat asked me to be a part of her Mega Fun Book Tour.  

Let's get to it then....  

If you're interested in learning to Machine Quilt on your home machine this is the book for you.

It's one of the most comprehensive Machine Quilting books I've read.

How can you NOT love a book that opens with this:
Not a beginner ?
You'll still love the content AND I know you'll want to create one of Pat's beautiful projects !
I did!!

There are 5 projects focused on machine quilting with a walking foot.
Here's my favorite -- Mini Charm Star:
and 4 projects focused on free motion machine quilting.
*
This applique project, Winter Bliss, just pulled at my heartstrings...
Can you see why?
I just had to make it!
Oh my goodness - sew much fun!

I decided to create with wool on a beautiful background of Primitive Gatherings Flannel Muslin.  The lovely Autumn Lily fabric by Blackbird Designs for Moda Fabrics topped off the borders.

Of course, I used Pat's (and my) favorite Aurifil 12Wt thread for hand stitching and a variety of Aurifil 40Wt for the free motion quilting.
*
Aurifil cotton thread is the best!
Pat has a fabulous section on thread and thread weights in the book -- very informative and helpful.
Pat's pattern and quilting instructions were perfect.
*
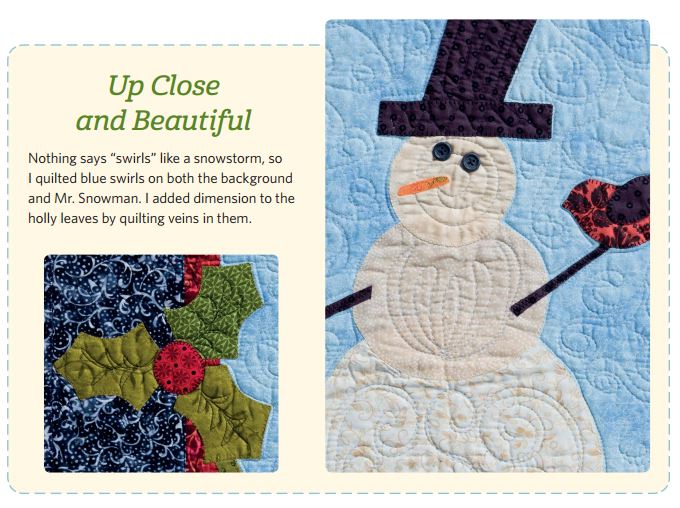
"Up Close and Beautiful" images of Pat's quilting are scattered throughout the book.
Pat's Winter Bliss Quilting
They helped me get past my fear of quilting on applique.
I used a few of Pat's very basic motifs in the center and some simple paisley and pebbles in the border.  My border pattern was pretty busy -- so the quilting is NOT the highlight of that section.
*
What I love about "Teach Me To Machine Quilt" is that Pat recognizes and calls out the pitfalls of machine quilting.
She clearly and accurately describes ways of getting around the worst of the them -- AND - it seems like she's sitting in the room with you, guiding you all the way.
*
I especially appreciate Pat's recommended 5-Step Plan for
improving your machine quilting skills.

You can do it!!  
I know you can. 
*
Are you inspired??
Get a copy of Pat's book, read it cover to cover, and get going one one of Pat's fabulous projects.
*

Finally

No Mega Fun Book Tour is complete without a Giveaway!
*
Visit Pat's Giveaway Page and Enter
to win 1 of 5 copies of
Pat's "Teach Me to Machine Quilt" book!

Physical copies for US Residents and e-books for all others.
*
While you're there, be sure to tour all the other stops.  You won't want to miss out on the other giveaways and projects.

I'm thrilled to share my day, November 30th with these talented quilters:

Kim Niedzwiecki -- www.gogokim.com/
Karen Miller -- YOU ARE HERE!!
Wendy Sheppard -- ivoryspring.wordpress.com/
Brenda M. Ratliff -- www.pinkcastleblog.com/

If you've not visited my blog before, you may want to get in this giveaway and sale before it ends on midnight November 30th!! 

Many thanks for stopping by!

Are you looking for Programs or Workshops for you Guild?
I'm booking Redbird Quilt Co. Lectures, Trunk Shows and Workshops for 2017 & 2018

If your Shop, Group or Guild is looking for programs or workshops I would love to hear from you.
Domestic Machine Quilting,  Wool & Needle turn Applique - Technique or Project oriented workshops are available.

Send email inquiries to karen at redbirdquiltco dot com
or redbirdquiltco at gmail dot com
*
Time to run... a have a little shopping to do.
Have a blessed weekend all and many thanks for your continued support!
YOU Make my World a Happy Place!
*
Follow me on social media:
Redbird Quilt Co. on FacebookInstagramPinterestTwitterYouTube
Facebook my FMQ Frenzy Community Group


Note:  The Federal Trade Commission requires me tell you that some of my blog content may contain affiliate links that, when clicked, may result in me earning a small commission.  


    Sunday, May 8, 2016

    Woohoo! APQ Podcast with Pat Sloan and A Quilter's Doodles Published!

    It's been a whirlwind of a few weeks here in Redbird Quilt Co. land but today I'm excited to share that I've been invited to chat with Pat Sloan, "The Voice of Quilting", on her weekly Podcast for American Patchwork & Quilting (aka All People Quilt).  Woohoo!  
    I Know!  Is that Crazy or What ?   

    When Pat emailed me I about fell over...   I've listened to Pat's shows for a while now, especially when one of my Quilty Mentors is on, like Wendy Sheppard & Karlee Porter, and Lisa Bongean, and Carrie Nelson (Miss Rosie's Mom)... Just to name a few from recent shows.

    Anyhow -- with working full-time it's sometimes hard to steal away for the live show -- so it's nice to know you can always listen later. 

    For tomorrow though (Monday, May 9th) I'll be on at 4pm Eastern for a 12 minute segment and following me are some amazing talented ladies!!
    Oh Goodness.... !!
    I was already excited to be chatting with THE Pat Sloan but when I saw my image on the same page as these other ladies I was really humbled.      

    I'm a bit nervous but here's the scoop: 

    Pat and I are going to be chatting a bit about Free Motion Quilting
     and a bit about my history
     -- and we'll sneak in a snippet about my newly self-published
    (with A LOT of help)
    collection of my hand-drawn quilty doodles
    (thanks for all your encouragement on this)

    Book Front: 
    Back Cover:
    I hope to have a few tips to pass along too!

    A Quilter's Doodles is made up of 20 of my
     #dailyquiltydoodles
    shown on Facebook and Instagram for the last several months.  

    I doodle at night or early morning
    to enhance my Free Motion Quilting skills
    and learn and practice FMQ motif.  
    Doodling helps build muscle memory so when you're stitching the designs out you don't have to calculate the motif as you go... 

    Here is one of my more recent doodles... from March 2016: 
    A Quilter's Doodles I - March 8th, 2016 - Copyright 2016 Redbird Quilt Co.
    A Quilter's Doodles I
    is available to purchase
     on my Redbird Quilt Co site
    ... you can see a few more sample pages there too!  
    It's all very exciting and I'll be sure to share a bit more about it after the show.

    Yes -- back to the show!! 

    If you can,
    tune-in just before 4pm on May 9th.  
    You'll find the live Podcast on this page ==>  Live PodCast
    In case that doesn't work here is another => Live Podcast II
    And just in case -- here is a direct link to Toginet
    where the banner across the top has
    the current live show playing => Toginet APQ Radio

    If you miss out on the live cast I'll be sure to share a link to the show archive when it is available.
    (Any of the 3 links above will take you to the archive ;) 

    From the bottom of my heart....  
    Many thanks for supporting my quilty adventures and crazy pathway
    to where I am now.   
    From blogging, to applique, wool,
    free motion quilting to tutorials, 
    Moda Bake Shop & other 
    pattern design, teaching and sharing --
    -- it's been a really fun ride and 
    I hope to keep giving back to all those that gave to and supported me.

    Hugs my friends -- until tomorrow.
    Karen

    More Info:

    I'm booking Redbird Quilt Co. Lectures, Trunk Shows and Workshops for 2017.
    If your Shop, Group or Guild is looking for programs or workshops I would love to hear from you.
    Domestic Machine Quilting,  Wool & Needle turn Applique - Technique or Project oriented workshops are available.

    Send email inquiries to karen at redbirdquiltco dot com
    or redbirdquiltco at gmail dot com
    *
    Social Media:
    *** Follow Me ***
    Did you know you can visit me on
    and/or
    I post all sorts of fun things there!!
    **
    If you love to Free Motion Quilt consider joining my 
    Facebook Community Group
    *
    Plus
    I share quilting related
    videos on my YouTube Channel
    *
    I'll soon be sharing live feed TV on my Periscope
    *
    I'm also on Pinterest and Twitter 
    and I share other tutorials and patterns on
    My Tutorials on my blog
    *
    I have a few patterns available in my Craftsy Store
    Thanks again for stopping by...

    Note:  The FTC requires that I tell you.... I occasionally use affiliate links on my blog and website.  I may be compensated for purchases made using the links.  Rest assured I will only share sales and promotions for products I know and love myself.  Many thanks for your support of my very small business.

    Wednesday, January 21, 2015

    Off my Rocker? Aurifil's 2015 Jan Mini-Quilt

    Greetings fellow quilters and bloggers -- it's been a couple of weeks since I last blogged and I do apologize. I've been a little under the weather and moving at a snails pace. 

    On one of my "good days" last weekend I had a hankering to make something that didn't require my creativity but still allowed me a bit of a challenge.   Turn to... something pieced. 

    Ya'll know that piecing is NOT my forte'.  I'm an applique (wool or cotton) girl at heart.   However, when I saw this sweet little mini-quilt, Flurry, designed by Gudrun Erla for Aurifil, I couldn't take my eyes off it.  Isn't it just the cutest little mini?
    Image Auribuzz.wordpress.com ~ Flurry by GEQuiltDesigns.com
    Gudrun was interviewed by Pat Sloan for Aurifil Thread.  You can get to know her and find the link to the Flurry mini-quilt on the Auribuzz blog by clicking here. 

    Now grab a cuppa and work through this sweet mini with me.  I'll share the tips that helped me out and approximate times it took to complete each step.  It really was fun! 

    Don't forget... if you share your quilt top on the Aurifil Flickr group you're eligible to win a box of Auriful thread!!  Woohoo -- you can NEVER have enough Aurifil thread.

    After downloading the pattern I spent an hour or so pressing and cutting my fabric per the pattern instructions.  Enter, this darling red print "Floral Gatherings" by Primitive Gatherings for Moda.  I've had this little pretty in my stash for a bit -- it was time to put it to good use.  Paired with that, I used "Indigo" by Moda and decided to reverse the colors as Gudrun originally designed.

    Before we get too far, let's not forget to discuss the perfect thread.   I used Aurifil 50Wt Mako Cotton in color #2370 (Sandstone).  Aurifil 50Wt thread is fine, so it adds to the accuracy of your piecing... this applique girl could use all the help she could get!!
    Here we go... now before you get started:

    Here's a tip:  It's really important to know that you have OR test your scant 1/4" seam allowance.  I explained how to do this last year in the Redbird and Berries Mini Quilt recipe for the Moda Bake Shop -- you can see that recipe here.    Pat Sloan did a similar post earlier this year - you can see it here.    In summary, sew (3) 2-1/2" squares together side by side, set seams, press toward the outside, flip right side up, and measure your inside piece.  It should measure exactly 2" wide.   It's really important on this mini to have an accurate scant 1/4" seam allowance.
    Image from Moda Bake Shop - Redbird and Berries Mini Quilt
    Onto Step 1....   

    Step 1 consisted of making 8 Half Square Triangles (HST) and trimming them to 1-1/2"... Feeling confident -- I can do this!!   HST's made... now to press them open.

    Here's a tip:  The pattern calls for the HST to be pressed toward the red fabric.  Did you know if you position your sewn piece with the upside being the side you are suppose to press toward that it makes it easier to "set the seam" and then press it toward that direction?  Try it... for each step in the pattern, when you're suppose to press toward "xyz" make sure you lay the sewn piece with that side up.  Press once to "set the seam" then use your fingers to fold the seam back and press again.   It helps to remember that whatever side is showing is the side your seam will be pressed toward.   Does this help?

    Here's the image before I opened them -- after I "set the seam":
    Here is the image after I set the seam, opened the seam and pressed again.   The seams are all pressed toward the red and they didn't need to be moved again to accomplish this step.  Love that!
    Now for the trimming to 1-1/2" square.   By now I'm already starting to curse Alex, Pat and Gudrun for not having an applique mini -- but keeping focused I continued on...   Ha ha ha ha...

    Here's a tip:  If you have one, NOW is the time to use the mini rotating cutting mat to trim your HST's.  This way you don't have to reposition your fabric to trim all 4 sides.   My DH gave me one for Christmas 2013 -- finally -- a chance to use it (you see - I never piece). 
    Step 1: Total time 23 minutes!! Includes boo-boo  (Can you believe I stitched ON THE LINE -- maybe it was the cough medicine -- ya - that was it!)

    Onto Step 2.  Ok lets follow the pattern again -- sew the HST's to the solid pieces.  That wasn't too bad --  I'm back to the "I can do this" mode....
    Step 2:  Total time  23 minutes 

    Onto Step 3.  Ok here is where I read twice and took care to position the pieces exactly as the pattern calls for - thankfully I did it right the first time.

    Having fun again!  Here is where I send an image to my sisters and say "Look, I'm piecing"... ha ha ha...
    Step 3: Total time 15 minutes (no boo-boo's)

    Onto Step 4:  I had pre-marked the diagonal line on my 1-1/2" squares after cutting them so I was ready to align and sew out of the gate.  (Yay!)

    Here's a tip:  Consider chain piecing when you're making these 8 pieces -- it allows you to be more efficient at your sewing, saves time and thread and that means saving money!!  Here is an image after chain stitching 1/2 of this step.   I did cut my pieces apart before I sewed and chain stitched the other side.
    OK - both sides sewn, trimmed, and pressed....  Whew...  I'm not sure they're square but I'm rolling with it by now (am I really making this pieced mini quilt ??)
    Step 4: Total time 15 minutes (no boo-boo's)

    Onto Step 5 - sewing WOF strips, cutting and making 4 patch units  -- I can do this ;)  Here we go....

    Here's a tip: This is another opportunity to chain stitch -- feeding each 4 patch unit in one behind the other - FAST!!
    Step 5: Total time 17 minutes (don't judge ;)   ha ha ha....

    Onto Step 6...  be sure to follow the directions as written -- I had to rip twice on this step (how did I do that ??)   Anyhow... No pictures of this one.

    Step 6: Total time 22 minutes (ripped twice ?? maybe to align my points ?? - I forget...)

    Onto Step 7.... Now we're making some 9 patches...  Humh.... I guess I can do this piecing thing if I just take my time, enjoy the process and pay attention to details.   I'm not one to do a lot of pinning but:

    Here's a tip:  If you're aiming to improve accuracy - be sure to nest your seams and pin there -- it does make a difference, especially if you're a novice like me.   Also, chain piece here too!

    No pictures for Step 7 - I'm seeing the end in sight and getting excited -- way ahead of myself and forgot to take pictures :(

    Step 7: Total time 30 minutes

    Onto Step 8 - If you weren't sure of your seam allowance before, you'll be sure to find out with this step.  If you pre-cut your pieces before sewing then they'll fit a perfect 1/4 " seam allowance or be too big or small otherwise.   Fingers crossed...

    Whew - worked out just fine...  Step 8 done.
    Step 8: Total Time 12 Minutes

    Onto Step 9 -- WOOHOO!!  Happy Dance... I still have hair left on my head...  Lets get this 3 x 3 sewn together now

    Here's a tip:  Pin, Pin, Pin -- there are a few seams to align -- I pinned mine.  It only took a few minutes and was so worth it!!   Someday maybe I'll graduate to big girl piecing but for now,  pinning is my piece of mind.

    Oh my gosh look -- I'm almost done -- I'm so happy and kinda proud that I could do this...
    Step 9:  Total Time 27 minutes

    Onto the final -- Step 10.  Adding those borders - here's another case where an inaccurate seam allowance will getcha....  I took a few minutes and squared my block before adding the borders.  A 1/16 trim here and there and the whole block squared up nicely.    Yay !
    Step 10: Total Time with Squaring 18 minutes

    Oh my goodness I'm completely thrilled to have made this cute mini -- many thanks to Aurifil, Pat Sloan and especially Gudrun Erla for the awesome pattern and instructions.  It was fun to make and total sewing, fussing, pressing time was under 3.5 hours!!
    Now to contemplate the quilting -- we'll save that for another day.

    Be sure to get your mini quilt made -- and follow the directions on the Auribuzz blog for entering your mini into the Aurifil thread giveaway.  There is no better thread for piecing, needle turn applique and dense quilting.

    Happy Sewing and thanks for stopping by!
    Karen