Faux ruched flowers are actually very simple to prepare once you get the hang of it. The resulting flower is out of this world!!
The ruched flowers included in this tutorial were prepared for the Chevron With A Twist quilt -- published on Moda Bake Shop Feb, 2015.
Where the sizes differ, notes have been included for the 2019 Aurifil Designer of the Month "Redbird Garden" Applique Block.
Begin with a square of fabric between 5″ and 6″ square.
2019 Aurifil Redbird Garden Block: Use (3) 7" square fabric pieces.
Find something round to use as a guide to mark a circle 1″ smaller than the fabric square. I used a small kitchen bowl.
Using a marking tool (I used a Sewline Pencil Lead in PINK) – trace a circle on the fabric square. (If your fabric is 6″ square, use a 5″ circle… trace a 4″ circle if you’re starting with a 5″ square.)
For the 2019 Aurifil Redbird Garden Block: trace a 6" circle on the 7" square of fabric.
Next you’ll use the outside circle as a reference to mark two concentric circles of dots on the fabric. The first set of dots will be made on the marked line. A 2nd set of dots will be offset from the first set and made appx 1/2″ inside of the marked line.
The circles in neon green below highlight the first set of evenly spaced dots on the marked line. Don’t fuss too much about how far apart they are or that there is the same number left and right, just rough them in. The camera didn’t pickup the pink marks very well — so use the neon green color to follow the marks.
Next, mark the 2nd set of dots appx 1/2″ inside the marked line and first set of dots. Center each of the 2nd set of dots between the 1st set (see below).
Next step – Cut the square piece of fabric into a circle leaving appx 1/2″ of excess fabric outside of the line you marked in Step 3.
Thread and knot a needle with a generous length (12-18″) of strong thread – use a complimentary color as some of the threads will show. I used Aurifil 50Wt Mako Cotton Thread and a #11 Straw Needle.
Bring the needle and thread up from the wrong side of the fabric on one of the 1st set of dots (on the marked line).
Fold under the excess 1/2″ of fabric on the marked line (wrong sides together) – you’ll fold as you go, just take one fold to start. Your starter knot will be buried in the fold.
Now sew a running stitch from an outside dot to an inside dot (1/2 of a “V” shape). You’ll take about 2 stitches between the two dots — don’t stitch too small, you’ll need to gather this running stitch to make the outside of the flower (the faux ruched edge).
Follow the “V” pattern in your dots with a running stitch, folding the excess 1/2″ under as you go and catching it with the running stitch.
Continue to sew a running stitch, connecting the dots in a “V” shaped pattern.
Now and then, gather the fabric within the running stitch. You’ll see the ruched (scalloped) edge take shape as you go.
Don’t pull too tight, you don’t want to break the thread else you’ll need to start over.
This is what it looks like from the back — be sure to “catch” the excess fabric with the running stitch as you go.
Continue to stitch and draw the thread taut to form the ruched edge (or scallop).
After you’ve stitched the “V” pattern around the perimeter, drawn the threads taut, AND you’re happy with the size and shape of the perimeter of the flower, put a knot in the area of the last stitch – this will secure your scalloped (ruched) edge so it won’t come loose.
Note: You can vary the size of your flower considerably by how tight you draw the thread before you knot it.
Note: Don’t worry that the center of your flower is “puffy” – we’ll tack that down later.
If you have thread remaining after knotting, leave it attached, you can use it when you attach the flower to the background fabric.
Image of the back of the ruched flower:
Once you’re happy with the size….
Prepare a total of 13 ruched flowers in varying colors and sizes. The faux ruched flowers on the sample quilt ranged from 2″ to 2-3/4″ in diameter. They don’t need to be exact 

For the 2019 Aurifil Redbird Garden Block: you'll create 3 flowers ranging from 2 &3/4 " in diameter to 3 & 1/4" in diameter.
Stitching the flower center:
Appliqueing the faux ruched flowers to the background fabric require two steps:
- Securing the flower edges (scallops) to the background
- Tacking the center fabric to the background
Step 1:
If you have the running stitch thread still attached to the flower, you can use it for this step. Else, prepare a new length of thread with a knotted end. You’re going to take small tack stitches through the folds and divots of the scallops to secure the outer edge of the flower to the background fabric (take care to NOT pucker, gather or wrinkle the background fabric).
Start with your needle and thread on the wrong side of the background fabric, come up in a scallop fold/divot, travel less than 1/8″ and go back down. On the back side, travel to the next scallop (or next stitch same scallop) and repeat the tack stitch process.
Work your way around the flower scallops taking one or two stitches per scallop. It takes a little time – but it’s important to secure the outside edge of the flower to the background.
Showing the wrong side of the background fabric after the flower scallops are secured (a stem is shown too)
Step 2.
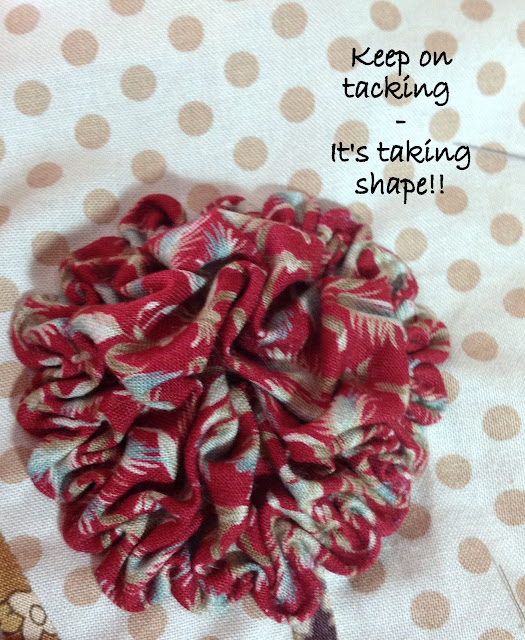
Once the scallops are secure you’ll again use tack stitches to knock down the center section of fabric and complete your faux ruched flower. You’ll take anywhere from 15-30 tack stitches inside the flower center for this step.
Start with a new length of thread (knotted). Pull the center fabric up/away from the background fabric (so you can find the middle).
With your needle, come up through the background fabric and directly through the middle of the flower. Take a small stitch and go back down through the middle and all the way through the background (drawing the center fabric down to the background).
Showing after the 1st tack stitch is taken:
Now pull another section of the fabric away from the background, travel and repeat this step, taking tack stitches here and there in the center fabric.
Each time you go through the background, fluff up the flower center and take another tack stitch to draw that area down.
Doing this tacking repeatedly will shape the center of the flower.
Here’s a look at the back at this stage:
The more tacking you do, the more folds or dimension will be created. It’s quite a fun process but requires patience #slowstitching.
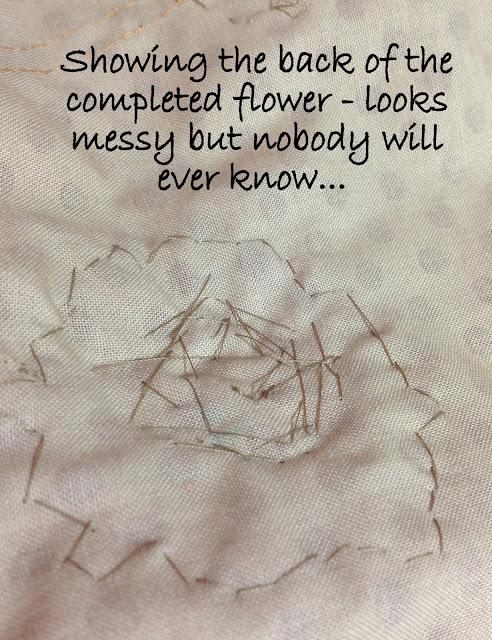
The back of the completed flower:
So now you know how to get through a faux ruched flower!! WOW — that was a big step but the payoff is great!
Now cycle through the remaining stems and flowers.
Use the placement diagram and attach one or two stems and flowers at a time — until you’ve completed all 13!
For the 2019 Aurifil Redbird Garden Block: create and attach 3 flowers and using this method.


MUCH easier than "coin ruching"!
ReplyDeleteLOVE this technique! I don't see a "Print" function on your tutorial page? Would sure be nice to be able to print it off or save as a .pdf.
ReplyDeleteI use pdf995 (free and have used for years). Click on "ctrl" & P and if your default printer is set to the pdf995 printer, then it will print this out and you have to choose where to save it. It's not a physical printer. Just prints to a pdf file o your pc.
DeleteWonderful instructions. love this! would really be great if you there was a way to save it.
ReplyDeleteI use pdf995 (free and have used for years). Click on "ctrl" & P and if your default printer is set to the pdf995 printer, then it will print this out and you have to choose where to save it. It's not a physical printer. Just prints to a pdf file o your pc.
DeleteLove your blog and tutorials. Hope it was ok to give these ladies a little know how on how to print stuff. I learned from someone on-line also. I also need to save for learning as I can't remember it. You're photos are super!!
ReplyDeleteAnother way to print is to highlight, copy and then paste it into a word document and save as a pdf file. Hope this is helpful.