Showing posts with label #redbirdquiltco. Show all posts

Wednesday, September 16, 2020

Fall Free Motion Quilting Lecture Series

We're back and excited to announce a
Fall Free Motion Quilting Lecture Series 
hosted by our good friends at 
Join Us -- It's Virtual! 


For details click the image below!


Don't delay -- 
Early Bird Bundle pricing 
is in effect NOW through Sept 20th!

I look forward to seeing you there.
Stay safe,
Karen


Saturday, February 13, 2016

2016 Free Motion Quilt Along - Part III Tools, Machine Setup and Practice

Greetings fellow quilters!
Welcome to Part III of the
2016 Redbird Quilt Co.
Free Motion Quilt Along

Today we'll talk tools, area & machine setup and FMQ practice.

It's important to read through the blog post AND watch the attached YouTube Video.
There is pertinent information in both parts of this lesson.

Note:  Watching the video from a computer will allow you to see the annotations and clarifications that have been added.
Be sure to try that out.
Our phones are great devices but don't always optimize the video viewing experience.
*
We're gearing up to free motion quilt the
Lewe's Balloons Growth Chart Panel
by Susy Bleasby for
 the World of Susybee.
Quilting fabric panels is a perfect way to practice and improve your Free Motion Quilting skills with minimal investment in time and money.

If you're just joining us be sure to checkout the previously published
Free Motion Quilt Along Posts:

Introduction => click here
Sponsors => click here
Supplies => click here
Part I Pieced Borders => click here
Part II Pin Basting ==> click here
How to Quilt That ==> click here

Also, be sure to jump over to our Sponsors Facebook pages and give them a "Like".
They're providing some fantastic products for the QAL Giveaways!
Many thanks to:
Aurifil Facebook
Quilter's Dream Batting
World of Susybee
Creekside Fabrics, Quilts and Yarns
Sew It Is Quilt Shop
Quilty Pleasures Quilt Shop
To learn more about the Sponsors click here.

***

Many thanks for your patience as we work through the QAL -- there is so much to learn it's hard to fit it all in!!

Today we're going to talk about area and machine setup -- along with a few of the tools and notions that I use to FMQ.  I'll also suggest a quick and easy FMQ practice session to get you "warmed" up.

Let's talk Quilting Area Setup:


I highly recommend you find a way to get your machine bed flush with the table top.  If you can't do that consider investing in an extension table for your machine.

Today I want to share with you my setup (as seen at our little cottage).

First, I take advantage of a LONG kitchen table (that comfortably feeds all of our grandkids at one time).

And years ago I invested in a portable sewing table, the Arrow Gidget II (on recommendation from Leah Day).
The Gidget II travels with me to Guilds, Shops, Home, Cottage, Retreats - - it's a perfect way to always be setup for FMQ.  It's not too heavy, has wheels, and isn't overly expensive.

If your local store or shop doesn't carry the Gidget II -- you can purchase it from Amazon -- make sure you get free shipping!


As you can see, I put the Gidget in front of the dining table
The Gidget II has an adjustable drop center that allows your machine to sit flush inside.
Once adjusted the machine fits right in and the bed is flush with the table top.
I add on the extension table that came with my Janome Horizon so that there are no holes around the machine bed.  It's really an ideal setup for FMQ.
I also add a portable table to the left to create an "L" shaped area to support the quilt top.
I can't stress enough how much the "flush" and "L-shaped" setup helps with stitch consistency and an overall improvement in the structure of your motif.  
It's desirable to have the quilt top totally supported while you FMQ.

Here's the setup in action with my latest design using BariJ's "Mille Fleur" fabric for Art Gallery Fabrics.   You can see more about this quilt on my Instagram Feed @RedbirdQuiltCo and in an upcoming blog post.
That concludes the machine AREA setup.  Was it helpful ?

Let's talk Machine and Notions

Next, in the video I discuss the machine setup and tools that work for me while I FMQ.  

Here are a few of my favorite tools:
The above tools are the ones I count on for FMQ'ing
Please review the Part III Video AND Do You FMQ - The Process post for more detailed information.

If you can't find these notions in your local quilt shop -- be sure to checkout my Amazon Store:
Here's the link:  Redbird Quilt Co. Amazon Store

Favorite Tools and Notions Summary:
Aurifil Cotton Threads
50 Wt for dense machine quilting (top and bobbin)
If your local shop doesn't carry Aurifil, be sure to checkout the stock at Bear Creek Quilting Company.  Shari carries The Subtle Sampler at an awesome price!

Little Genie Magic Bobbin Washers
 for keeping that bobbin spinning smoothly

Supreme Slider by LaPierre
 for keeping that fabric moving smoothly
Purchase from Amazon by clicking the link below:


Machingers Quilting Gloves
for getting a grip on the fabric
Purchase from Amazon by clicking the link below:


FMQ Darning Foot
as seen in video, several options

Quality Needles
A good needle can make or break you.
See options in video

If you can't find these notions in your local quilt shop -- be sure to checkout my Amazon Store:
Here's the link:  Redbird Quilt Co. Amazon Store

Learn more in the video and in this blog post:
Do You FMQ - The Process
*
In the video I talk about covering (vs dropping) the feed dogs...
Here are some detail images of the template plastic setup I use to cover the feed dogs.
Here is the cover in action:

Be sure to Practice

Also in the video I suggest a way to practice your FMQ on a quilt sandwich so you can evaluate how the thread, needle, batting, hand and machine speed work together.

Ideally you'll want to fine tune the tension on your machine with a comparable quilt sandwich before you begin quilting the panel.

On the Janome I set my upper tension higher to get nice quilt stitches.  You may need to do the same.  Give it a try and let me know how it goes!

If you've had limited exposure to FMQ it's a great way to jump in and practice

Be sure to jump over and watch the  Part III Video

What's Next:

In our next session we'll get the stabilization stitching done AND begin to quilt one of the subjects.

For each motif we use I'll share a still drawing giving quilting path AND I'll try to record a video of me stitching it on the panel.

I intend to show you each step so we work through it together.

Again I appreciate your patience - we're getting there!  Next time we'll be stitching up a storm.

If you could, please let me know about your setup by leaving a comment:

What machine are you working on?
Do you have a flush setup?
Do you have a cabinet or extension table?
Are you giving the Aurifil thread a try ?

Have a fantastic week and Happy Valentine's Weekend!
Karen

Monday, December 21, 2015

Chevron Shuffle on the Moda Bake Shop - A Modern Mini

Greeting fellow quilters -- thank you for stopping by!
I've been busy lately preparing a new recipe for the Moda Bake Shop and I'm excited to share it with you today.
Chevron Shuffle is a modern mini quilt prepared with the colorful and bright
Basic Mixologie by Studio M for Moda.
It finishes just about 24" square.
The design is based on my
February 2015 Moda Bake Shop Recipe
Chevron with a Twist and was created to celebrate the Bake Shop's December Month of Mini's.    
The recipe uses 84 print/white Half Square Triangles and 16 white/white Half Square Triangles.
The quilt top uses well less than 2 Charm packs and can be prepared in a weekend.
 For some fun I decided to use the "Focus" layout shared in the March 2015 post For the Love of Half Square Triangles.
The Focus layout uses the same number of HST's as Chevron with a Twist but they're arranged differently. 
On Chevron Shuffle I strayed from traditional applique and created a modern layered flower that complements the half square triangle design.
Also on Chevron Shuffle I tried some
new-to-me batting,
Dream Orient, by Quilter's Dream.
It's really unique batting -- dense but soft, all natural fibers, and oh-so-dreamy!  
I layered the Dream Orient with Dream Wool (100% Wool batting).

These two layers of batting provided for generous quilting texture, don't you think?
Other fun parts of preparing Chevron Shuffle included quilting with my favorite Aurifil threads in 3 different weights.  50 Wt for piecing, 40Wt for quilting and 12Wt for machine applique and top stitching.
Do checkout the Moda Bake Shop post to see all the details.
You know I love Aurifil thread!
And one last fun component of this quilt was using the QP Curve Templates to create some beautiful curved quilting texture around the modern flower.
I used a water/air soluble pen to mark my reference points 1/4" (A) and 1/2" (B) in from the seam points.  The #8 QP Curve Template worked beautifully!
If you've not tried out Linda Hrcka's
{The Quilted Pineapple}
curved acrylic templates you should.
I use them on my domestic machine to make beautiful designs.  They certainly open up a whole new world of quilting options -- even on your home machine.
*
You can read more about the QP Curve Templates on this post.
***
To view a few videos of my using the templates on my home machine,
 click on over to my YouTube Channel
***
If you have an interest in learning to Free Motion Quilt on your home machine, be sure to join 4000+ other quilters on my Facebook Community Group
 Free Motion Quilting Frenzy.

Also, I'll soon be starting a short but informative Free Motion Quilt Along -- stay tuned to my blog and/or my Facebook Page for more information on that.
Supplies and schedule to be announced soon.

Many thanks for stopping by -- I do hope you like the new Chevron Shuffle Mini Quilt.
Jump on over to the Moda Bake Shop to view all of the details.

Social Media ....
Have you made a quilt inspired by my patterns or tutorials 
-OR-
Would you, your shop, or your guild be interested in my Workshop or Program offerings ? 
You can write me anytime:  
karen@redbirdquiltco.com or 
redbirdquiltco@gmail.com

*** Follow Me ***

Did you know you can visit me on
and/or
I post all sorts of fun things there!!
**
If you love to Free Motion Quilt consider joining my 
Facebook Community Group
*
Plus
I share quilting related
videos on my YouTube Channel
*
I'll soon be sharing live feed TV on my Periscope
*
I'm also on Pinterest and Twitter 
and I share other tutorials and patterns on
My Tutorials on my blog

Thanks again for stopping by...

Have a blessed holiday.
Karen

Saturday, December 5, 2015

Tis the Season - A Donation Quilt

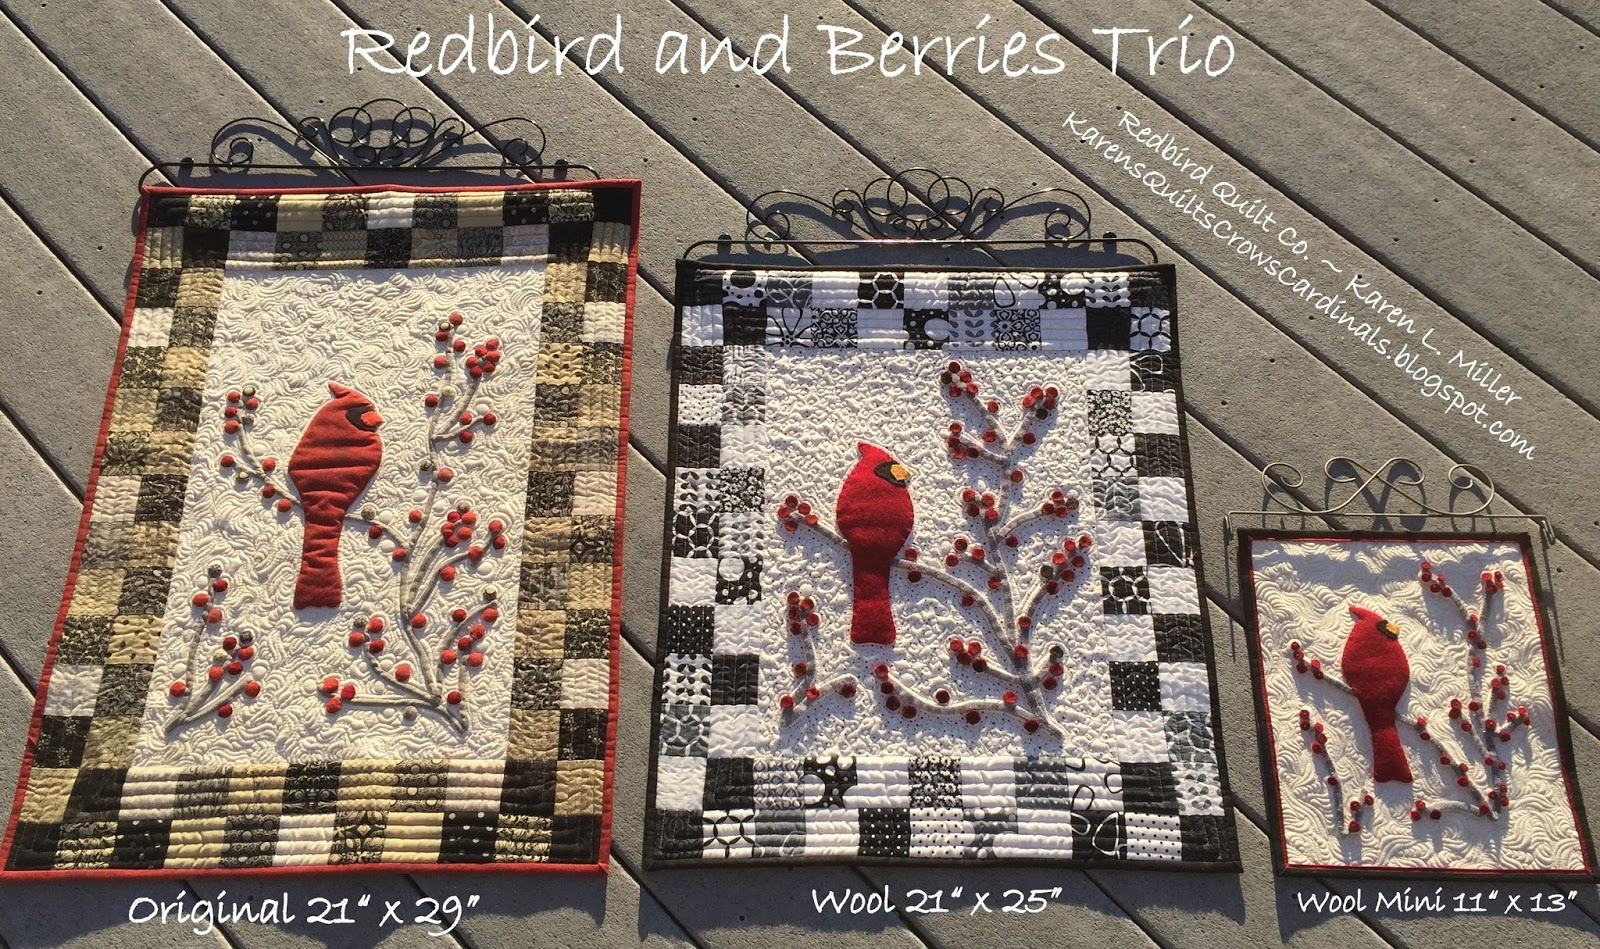
Mr. Redbird and Berries has gone mini!
Really Mini
A wee 11" x 13"
Isn't he sweet?
 He was created for the O Tannenbaum fundraising event at our local Historical Society...
with a little Moda Muslin for the background and backing fabric...
using Aurifil 12Wt cotton thread to hand stitch the wool applique... 
AND a bit of Aurifil 50Wt thread for fun free motion quilting
on a domestic machine...
It was the perfect opportunity to re-use the
flanged and mitered machine binding technique
(See the tutorial here)
using this beautiful fabric by Primitive Gatherings for Moda -- LOVE!
And yes, on that binding I used yummy Aurifil 12Wt thread for finishing with a machine.
Oh! I love that little extra touch :)
I was sure to use 2 layers of Quilter's Dream 100% Wool batting -- it provides lovely texture!
Last I checked the silent bid was up to $75 - not a bad price for a mini quilt
Bidding is open for another week though -- you never know what it will go for.
The donation quilt is considerably smaller
 than the original Redbird and Berries
created for the Moda Bake Shop.
Click here for the original tutorial and download.
Making little pieces like this are fun and rewarding...
especially for a great cause.
Sister snapped a picture of me at the O Tannenbaum event... 
I thought it would be fun to share! 
*
If you've not tried wool applique and would like to learn more...
Click here and follow the links for some introductory posts.

Have a blessed weekend...
Hugs,
Karen

Social Media Details....
You can write me anytime:  
karen@redbirdquiltco.com or 
redbirdquiltco@gmail.com

*** Follow Me ***

Did you know you can visit me on
and/or
I post all sorts of fun things there!!
**
If you love to Free Motion Quilt consider joining my 
Facebook Community Group
*
Plus
I share quilting related
videos on my YouTube Channel
*
I'll soon be sharing live feed TV on my Periscope
*
I'm also on Pinterest and Twitter 
and I share other tutorials and patterns on
My Tutorials on my blog

Thanks again for stopping by...

Thursday, April 23, 2015

Sharing Orange Peel Grid Tutorial and Do You Have a Favorite Blogger ?

Greetings fellow quilters!  I hope you're having a fine week and finding time to stitch. 

In Upstate NY, USA we're having wild weather again.  Lots of rain last week -- then some days in the 70's -- and tonight they are calling for snow.

Before the snow reins down on us I decided to get a shot of a sweet daffodil in my overgrown front garden.  What a sight for eyes that have seen far too much snow this year.    

Long live the daffodils!
As always, there is a lot going on here at home - I'm getting caught up from my first overnight Lecture and Workshop with the First Dutchess Quilters in the Hudson Valley area of NY.   It was a great trip and fantastic experience with a bunch of talented, warm, and fun-loving quilters. I'll share more about that event in another post.

Today I wanted to share a new tutorial with you -- a quilting design I'm referring to as "Orange Peel Grid".   This design takes a crosshatched grid and turns it into a design full of texture and movement.  It's really simple to setup and to stitch and is a design you MUST add to your Design Motif list.
The design has been floating around the Free Motion Quilting world for a while now -- I was first inspired by a similar design shared by Diane Gaudynski in her AQS "Quilt Savvy" book. If you're into Free Motion Quilting, Diane's book is a must have.  She shares all sorts of FMQ tips and tricks and quilting designs -- I love thumbing through it (the quilting and images are out of this world!).

After seeing Diane's work, and some other beautiful variations on the internet, I decided to give this a try but with an added twist.  Instead of just marking the straight line grid, I used the walking foot on my Janome Horizon 7700 and stitched the grid.   The stitched grid provides you a blueprint to complete the rest of the design with FMQ Continuous Curve stitching.
On the sample above I 'marked' the grid on the fabric using a Clover Hera Marker to put a crease in the fabric.  It works out wonderfully and allows me to skip putting actual marks on the fabric.

For the grid marking details you can review this You Tube video "Orange Peel Grid Design - Part I - Preparing the Grid on Paper". 

After I creased the fabric, I used the walking foot on my Janome Horizon 7700, some Aurifil 50Wt thread and two layers of Quilter's Dream - Dream Wool to stitch the straight lines.   If you like, you could also use a free motion quilting foot and a straight line ruler to stitch the grid. 

Once the grid was stitched, (video above) I used a free motion quilting Ruler foot (you could use any FMQ foot, a darning foot, open toe darning foot, couching foot, etc) to quilt continuous curve lines around the grid.

This next video outlines (on paper) how to stitch the continuous curve design.  Click here => "Orange Peel Grid Design - Part II Continuous Curve on Paper" 
Lastly, there is one more video showing me actually stitching the Continuous Curve design using my domestic/home machine, Janome Horizon 7700.   You can view that video here:  "Orange Peel Grid Quilting Design - Continuous Curve on a Domestic Machine"
I would LOVE to know what you think about the videos and their tutorial value.  Thanks for any feedback you can provide, it helps me improve things over time.  To stay in-tune with future tutorials and demonstrations, subscribe to my YouTube channel at this link.

Lastly, before I go, I wanted to tell you about the National Quilters Circle Blogger Awards (currently open for nominations through April 29th).  The National Quilters Circle is an organization that provides technique and project tutorials and videos to the world of quilters.  You can read more about their mission here.
They currently are hosting a fun new online competition where YOU get to determine this year’s best quilting blogs in any one of these 7 nomination categories:

• Best Traditional Quilting Blog
• Best Modern Quilting Blog
• Best Quilting Patterns Blog
• Best Fiber Arts Blog
• Best Art Quilts Blog
• Most Humorous Blog
• Best Overall Quilting Blog

It looks like a fun competition and I'm sure it will open our eyes to some great new Quilting related blogs.  You can read more about the competition and nominate your favorite blog at this link..   Stay tuned to the NQS blog for the voting stage that begins in early May and ends May 15th!

Do you have a favorite blogger (or two ?).

Thanks for stopping by - I have a sleeve to stitch down before I call it a night.  Have a great remainder of the week!

Hugs,
Karen

Monday, March 30, 2015

Half Square Triangle Love and Giveaway!

Greetings fellow quilters!! 

Today on the Moda Bake Shop I'm sharing a little Half Square Triangle LOVE.

You see, I used the Electric Quilt 7 software (EQ7) when designing Chevron with a Twist for the Moda Bake Shop.  During the process I stumbled upon an EQ7 "feature" that rearranged the half square triangles in-place, rotating them without moving their original location.   WOW -- I was amazed at all the different layouts I could "click" through!!
Once I got the hang of it, I created a bundle of different HST quilt layouts with just a few EQ7 clicks:

I was really excited to see that changing the orientation of the half square triangles in their original positions on the quilt would yield such a variety of quilt designs.

I've shared 7 of my very favorite layouts on the Moda Bake Shop - so be sure to jump over and check them out by clicking here.

Below are a few more designs to ponder -- remember - on each one of these designs the HST's are in the same position on the quilt but oriented in a different direction to make a new design.

The Top Down Layout:


The Scrappy Diamond Layout:


The Basic Chevron Layout:


Each one of these quilts, and the 7 layouts I shared on the Moda Bake Shop, can be made using my "Chevron with a Twist" recipe.

To see the original Moda Bake Shop recipe for "Chevron with a Twist" click here.
To read my original blog post about "Chevron with a Twist" click here.

Are you interested in the quilting designs used on "Chevron with a Twist" ?
I recently shared a blog post and two YouTube videos about marking and quilting the Curved Crosshatching on a domestic machine using the wonderful QP Curve Templates!!    

Click here for the blog post (it includes links to the Videos)
OR
Click the image below to view the Marking a Curved Crosshatch Video:

Click the image below to view the Quilting a Curved Crosshatch using TheQPCurveTemplates Video

And just today I published a YouTube Video for creating the Feather Star-burst block!!
Click the image below to view the Quilting the Feather Star-burst block using TheQPCurveTemplates
Stay tuned for a coordinating blog post and still image tutorial on Feather Star-burst...
***
I just love those QP Curve Templates by Linda Hrcka for The Quilted Pineapple - learn more about them here and in my post link above ^^.

Now, we can't let this opportunity get by without a giveaway... 

How would you like to make one of the Chevron with A Twist layouts using a Moda Charm Pack ?   It would make such a cute little wall hanging...

My good friend Cindy from Sew It Is Quilt Shop has donated a Laundry Basket Quilts Heart's Content Moda Charm pack so one of YOU can make a mini quilt by adding just a little yardage.


Sew It Is Quilt Shop is my local go-to-for-great-prices shop - with a fantastic online store too!!

Checkout Cindy's Moda Sale Fabric (all less than $7.00 /yard) here.   Or, look for the newer lines of Moda Fabric that are all $9.00 or under here!!  Like I said, fantastic prices!!

While you're shopping, if you're ready to purchase your own version of EQ7 - Cindy has that too, and will ship it for free!  If you live locally, be sure to ask her about the two hour EQ7 tutorial included with your purchase. Click here for EQ7.


Now... Let's get on with the Giveaway!!

Leave me a comment letting me know which one of the 10 Half Square Triangle layouts YOU like the best.  There are 3 in this post and 7 on the Moda Bake Shop post.
That's it!!
(Don't forget your email address)

The Giveaway is open through end of day Saturday, April 4th and is open to everyone!

***

Before you go - there's one other active giveaway on my blog.
How about this beautiful Aurifil 12Wt  Designer Thread Collection by BariJ ?  
Aren't these threads "Splendid" ??
To learn more and get in on the Aurifil giveaway click here (ends 3/31) 

Thanks for stopping by and Happy Stitching!!
Karen